

![]()
Painting
![]()
Airbrushing
If at all possible, seriously consider using an airbrush
for the majority of your model painting. This alone will have a major impact on
the final results.
You never want to let paint sit inside an airbrush. You're just asking for problems. So, some people avoid using an airbrush because the time needed to clean it. Once you get to know your airbrush, cleaning time becomes insignificant. It takes me about 5mins to thoroughly clean my Paasche VL or Paasche VSR90 airbrushes. I also find cleaning my Paasche VSR90 (gravity fed) requires a bit less effort than my Paasche VL (siphon fed) since there is less paint inside the VSR90's body than in the VL, or any siphon feed airbrush for that matter.
I take steps to minimize the number of thorough cleanings I have to do. To do this I prepare as many parts as possible before a painting session. Then I start with the lightest colour working my way up to the darkest colour and leaving the metallics until last. In between colours I spray some straight lacquer thinner (or rubbing alcohol when spraying acrylics) to flush out the airbrush. Doing this means any paint contamination will be a light colour into a dark colour, which isn't as noticeable as a dark colour contaminating a light colour. By doing this, I only have to do one, or at most two, thorough cleaning in one painting session.
![]()
Brush Painting
February 23, 2003
I use an airbrush for most of my painting, but occasionally its easier and
quicker to hand paint some parts or details with a paintbrush. Brush painting
requires using a quality paintbrush and proper tip for the type of brush
painting you'll be doing. If painting body parts, you'll need a nice flat and
wide brush to cover large areas in a single stroke. For detail painting, you'll
want a fine round tipped paintbrush.
I believe brush painting requires more skill than airbrushing and it must be practiced since different paints (enamels, lacquers, and acrylics) behave differently. The best way to practice is on unused kits parts on one the sprue 'trees'. If several coats are needed, be sure each coat is thoroughly dry before applying another coat.
- Enamels - a very slow drying and the will have time to flow to level brush strokes. A good choice for body parts.
- Lacquers - dry very fast and you really can brush paint large areas with them, just detail painting.
- Acrylics - a good compromise between enamels and lacquers. These also dry fairly fast. To help avoid brush stokes, apply liberally as there is a lot of carrier in the paint that will evaporate and leave a nice uniform coast of paint.
![]()
Clear Coating
![]()
July 20, 2004
There is several types of clear coats: gloss, semi-gloss, and matt (flat)
depending on the desired result you want on your model. There are several
reasons for applying a clear coat of paint:
- to seal in decals and help them blend into the bodywork so they have a painted on look.
- to protect a fragile colour coat.
- improving the final gloss of the finish without adding colour coats.
- the colour coat is matt and you can make it a gloss finish with a clear gloss. Most 1:1 cars these days are painted with a base coat (flat) and then have several gloss clear coats applied.
- for military subjects that have matt paint, you need to apply several different clears to make the decal look like matt paint. Gloss clear coat so decal has a nice smooth surface to adhere to, apply decal, another gloss clear coat to blend decal into surrounding paint, and finally a matt clear to resort the matt finish of the model.
There is always a debate about which clear paints a modeller should use. Each has its pro and cons.
- Enamels - Like Testors dry slowly and have more time to flow and create a very smooth surface. The con is that you must shield the finish from dust as the paint stays soft long enough to dust to sink into the paint. A friend uses nothing but TS-13 for models that will be displayed in the Tamiya distributor's office and has never had a problem.
- Lacquers - Like Tamiya's TS-13 dry fast and there less danger of dust marring the final finish. Big con is that lacquers are 'hot' and can attack the decals if too much is apply too fast. A mist coat that dries fast and protects the decals is the way to go.
- Acrylics - Like Model Master Acryls within a few hours, flows nicely, and dries very hard and can be polished. Other acrylics can remain soft and can not be polished.
One major con with clear coats is that some types of clears can yellow over time. This may be more of a problem with oil based paints like clear enamels. Because of potential yellowing, I've always been reluctant to use clear coats on motorcycles and cars. When I do use clear coats, I use Model Master Acryl Gloss and Flat clears with very good results.
![]()
Paint Compatibility
May 23, 2003
There are different types of paints: acrylic, enamel, and lacquers, and one has
to be careful when applying one type of paint over another. This is because of
the chemicals used to thin the paints. People usually refer to the paint as
being weak to very hot. Here is a table showing which paints can
be safely applied over other types of paint.
| Acrylic (weak) |
Enamel (hot) |
Lacquer (very hot) |
|
| Acrylic (weak) |
|||
| Enamel (hot) |
|||
| Lacquer (very hot) |
In general, hotter paints shouldn't be applied over weaker paints. However, it can be done if light coats are airbrushed so the aggressive thinner of the hotter paint evaporates before has time to react with the weaker paint.
![]()
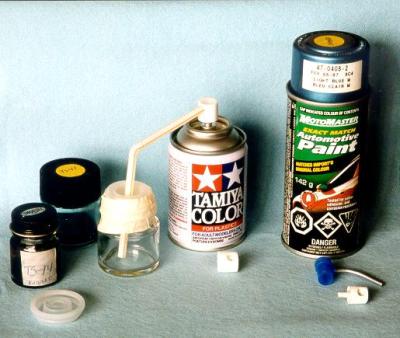 Emptying Paint from Spray Cans
I've only used a spray can once, and never again. To me its
like using a fire hose to water a potted plant!
I only empty what I need into a small bottle. I modify the nozzle by drilling it out with a 1/4" drill so I can push a small drinking straw into it. The kind of straw that you can bend at one end. I then put a lid with a hole for the straw and a small vent hole on the bottle. I tape it down so it won't come off during this process. I then spray through the straw, while holding the straw in place, and collect the paint in the bottle.
The spray can's propellant will cool the paint down so I put the bottle in a pan of hot tap water to warm the paint. This will also help the paint to 'gas out' the propellant. I also stir the paint to help it 'gas out'. Only then do I put the lid on the bottle or use it in my airbrush. If you don't do this, pressure from the propellant will build and the paint will spray when you open the bottle or squirt through the airbrush bottle vent hole.
Some modellers actually empty the entire can by first releasing all the propellant and then cutting the top off the can and pouring the contents into a bottle. However, for me this poses a storage problem since good air tight storage bottles are hard to find. So far the only decent bottle I've found that I can rely on for storing paint to extended periods are Tamiya's acrylic bottles. But, at only 23ml and 10ml, you'd need 5 or 10 bottles respectively to store the contents of one 100ml spray can. Even more bottles for the larger automotive touch-up cans I have.
For example, on my RoadStar I probably only needed about 10-15ml of Coral Sea from the 100ml can. Since I don't know when I'll need Coral Sea again, the remaining 85-90ml is still in the nice and air tight spray can.
![]()
Gloss White
Submitted by André Boucheré
When trying to paint gloss white on dark coloured styrene, undercoat with
flat white or
primer, this will give the gloss white a textured surface to adhere to so it won't run away
from the edges.
![]()
Holding Parts
Submitted by André Boucheré
- Use toothpicks or cocktail sticks to mount parts prior to airbrushing, most parts have a small hole somewhere or you can use a small piece of tape mounted to the backside.
- Use plasticine to stick toothpicks in, provides a great place to store freshly painted parts, it's a great third hand.
![]()
Masking with Paper Towel
If you need to mask a highly complex surface that has fragile paints like
metallizers, then give this a try.
Apply wet paper towel to the part and push it down into all the nooks and crannies and then let dry. The paper towel will hold its shape and 'stick' to the part. Airbrush the part making sure to spray away from the edge of the paper towel so there is no way to blow paint under it. Remove paper towel. I tried this for the first time on the YZF-R1's engine since the cylinder head needed to be semi-gloss black and the engine case aluminium.
BTW, you can also use facial tissue but NOT toilet tissue. The latter is designed to 'dissolve' once wet.
![]()
Match 1:1 Colours
A lot of modellers get too caught up in finding the 'right' colour for their
models. Unless you see the 1:1 motorcycle in person you can only consider photographs as a
guide and not the the definitive answer. The photography and printing process greatly
affect the final colour on the printed page.
And don't forget lighting conditions. A colour changes under different light sources. A colour that looks perfect in natural sunlight will look different under incandescent and fluorescent lights.
So, paint your model with the colour that looks 'right' to you, but don't waste too much time and energy finding the perfect colour.
![]()
Mixing (1)
To get consistent ratios when mixing paint or thinning paint, I use eye droppers
for extracting paint and thinner from the bottles. The eye dropper draws a consistent
amount of paint or thinner and I have better success duplicating ratios time after time. I
prefer the eye dropper made of glass since they're easier to clean up.
![]()
Mixing (2)
Submitted by André Boucheré
When using paints, glues, solvents always remove some from their containers, this avoids
contamination of the rest of the material.
![]()
Mixing (3)
I found the ideal stirring sticks for mixing paint. Use plastic coffee and tea
stir sticks. Several hundred only cost a $1 or $2 and will last a long time.
Also, place two or three ball bearings in your bottles of paint. They act as agitators if shaking the bottle to do the initial stirring.
![]()
Mixing (4)
Submitted by Peter Janmaat
I read somewhere that a lot of modellers use eye droppers to mix paints.
I have found a good solution to having a marker so you know how much paint you might mix.
I paid a visit to my local hobby shop and they sold the eye droppers for about $5AUD
each and the spare glass jars at two for $7.50 a pair. Thought to myself what a rip off and walked out without what
I needed. Right next door to them is a chemist and I went in there and asked if they sold eye droppers.
I explained what I was after and the sales assistant suggested I buy some plastic syringes as they are marked and can be reused after cleaning with thinners also ended up buying 30 small plastic tablet bottles at 20 cents each and ten syringes for 15 cents each.
So for a outlay of $7.50, I have a good supply of paint bottles and a system to measure
accurately paints. Also, plumbers threading tape ensures a good seal on
bottle tops.
![]()
Multi-coloured Parts
Submitted by André Boucheré
When airbrushing a masked area, always spray away from the tape, this will prevent
bleed under and result in a cleaner line.
![]()
Personal Health
Submitted by André Boucheré
- Invest in a proper respirator mask that protects you from "organic vapors", prolonged use with enamels, metallizers, SnJ polishing compounds, thinners and other solvents can have detrimental affects on your health. Long-term affects are not known, don't become a statistic for the cost of a couple of bucks!
- Use latex gloves to protect your hands from harsh paints and thinners. These also to prevent fingerprints on painted surfaces.
![]()
Priming
February 23, 2003
Although you can, you do not need to primer every part of a model. I prime only
necessary parts to keep the layers of paint to a minimum. There are two reasons
to prime parts before applying a colour coat:
- To detect defects in parts that need to be filled and sanded before painting. This is mostly a result of modifying parts, but it is a good idea to prime body parts as they many have scratches that are difficult to see.
- The plastic's colour is drastically different from the colour coat you want to apply, so you need to apply a neutral base colour first. For example, you shouldn't apply light colours over dark colours. Such as white over black. In most cases a grey primer is fine. But for colours like red, yellow, orange and other translucent colours, you should use a white primer.
When priming body parts, I'll lightly wet sand the dried primer with 400grit wet/dry sandpaper to smooth the surface of the primer. If you rub through, just touch up the spot. Then wash and let dry for several hours before applying the colour coat. I prefer to use Plasti-kote's Sandable lacquer primers.
![]()
Thinning
February 23, 2003
Whether to thin paint is something that has to been determined on a case by case
basis. If you do need to thin the paint, transfer some paint into another
container and thin that. Do not an thinner to your bottle of paint.
- Brush painting - some brands of bottled paints are very thick and others are very thin. If detail painting, you probably don't have to bother thinning the paint. If you will be painting large areas, I find adding a some thinner helps the paint flow better and eliminate brush strokes.
- Airbrushing - most paints will have to be thinned in order to go through an airbrush. However, some paints are intended for airbrushing only and will come ready for airbrushing. Again, whether to add thinner and how much differs from case to case. One thing you hear a lot is "Add thinner until it has the consistency of milk". Once you're familiar with your airbrush, you'll know when the paint looks right.
|
|||||||||||||||
 Home - News - Tips - Gallery - Workshop - Kits - Links - What's New? - Site Index |