


![]()
Fairings
![]()
Assembly
February 28, 2001
Some fairings are in two halves that have to be glued together. I use Tamiya's
Extra Thin Cement to gluing the halves together. This cement melts the plastic
and actually fuses the two pieces together. To ensure the halves are aligned, I
push the seam along a piece of glass. This will give you a perfect seam. Once
the cement has dried, I use a Flex-I- File with a loose strip of sandpaper to
clean up the seam. In most cases the seam in perfect with no need to use filler.
![]()
Decals
Only cut decals from the sheet as you need them, otherwise you can easily misplace them.
Cut as close to the decal as possible to remove the excess carrier. After decaling
is complete, a clear coat (gloss, semi-gloss, or matt) should be applied to protect
and 'seal' the decals onto the model. More decal tips
![]()
Painting
If the inner surface of the fairings need to be painted a different
colour, paint
the inner surface first. It can be very difficult to avoid getting over spray
on the
exterior when paint the inner surface last.
Polishing Plastic
On some models it best to leave the plastic piece unpainted. To replicate plastic fenders on motocross motorcycles, etc. But, in most cases you must not leave the piece untouched. I use TurtleWax Polishing Compound or Tamiya Polishing and Rubbing Compound to polish the plastic to give it a uniform appearance and really shine up the piece. Polishing is also necessary before using metalizer paints Like SnJ and Testors to achieve a blemish free polished 'metal' surface.
Be sure to wash the polished pieces with soapy water to remove any remaining polishing compound.
![]()
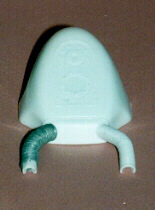 Ribbed Ducting
Some ducting is 'ribbed' and has a mould line down either side. This doesn't look
very nice even after cleaning up the part. So, I file off the ribbing and then slide a
loose coil of 28gauge wire over the ducting. The coil is made by wrapping the wire around
a 5/32" drill bit. The wire is then fixed into place with some CA glue. For the
'webbing' in between the wire, I coat the wire with CA glue so it fills in between the
wire spiral. This results in a very convincing hose and looks 100% better than the kit
part.
|
|||||||||||||||
 Home - News - Tips - Gallery - Workshop - Kits - Links - What's New? - Site Index |