98/11/15
- Brake Discs - drilled out all three discs using a pin vise. A total of
336 holes, 672 if you count cleaning each from the back. It took 1 1/2 hours!
- Frame - assembled the main frame, but left the rear portion unglued to
allow for the installation of the rear shock after the frame has been painted with
metalizer and buffed.
- Cleaned up the rear shock, clutch and alternator.
|
98/11/16
- Cleaned up and assembled the tank/bodywork.
- Cleaned up the wheels, cowling, tank/bodywork and front fender for priming.
|
| 98/11/18
Primed the wheels, cowling, tank/bodywork and front fender.
|
98/11/21
- Removed and cleaned up all parts on sprues A & B.
- Assembled parts that will be painted the same colour.
- Drill out lightening holes in A16, A18 (porting linkage) and A27 (lower shock).
- Exhaust Pipes - assembles the exhaust pipes and filled ejector marks
with CA Glue.
- Silencer Retaining Springs - made exhaust retaining springs by wrapping
fine coil wire around a small drill bit.
- Silencer Retaining Spring Brackets - made brackets from aluminum from
Coca-Cola can.
|
| 98/11/22
Today was an excellent day for painting since the humidity was low...
- Bodywork - used Ford & GM Engine Blue. I'll remove the windscreen
masking tomorrow, but will leave the body for at
least a week before rubbing out the paint.
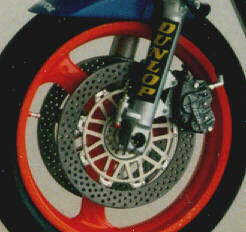
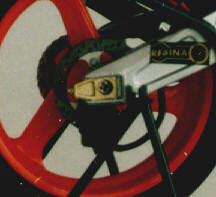
- Brake Discs - the disc centers and rear sprocket were done with a 1 to
1 mixture of Non-Buffing Aluminum and Non-Buffing Brass. A draftsman's circle template was
used to mask the center so the braking
surface was not painted.
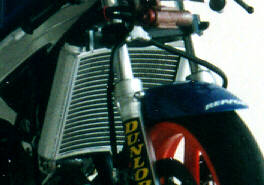
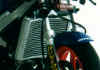
- Frame, Swing Arm and Radiator - were done with Buffing Aluminum Plate.
As well as various individual components. Once dry, I buffed the parts until I was
satisfied with the sheen. Only the radiator's surrounding case was buffed making it stand
out from the core. The radiator's core was 'washed' with X-19 and really adds depth to the
final finish.
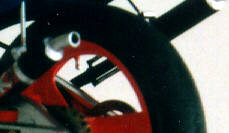
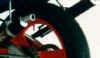
- Silencer Retaining Spring Brackets - glued on the retaining brackets
for the silencer springs with CA glue to the exhaust pipes. You can see the springs
through the wheel in this picture.
- Wheels - used Gloss Orange.
|
| 98/11/24
Not much done today. The Ford & GM Engine Blue is still not
sufficiently dry to even think above handling it to remove the
Maskol.
- Experimented with how I might make wire hose clamps for the radiator hoses. At first I
tried silver thread but it was too hard to manipulate. Then I found some extra fine wire I
forgot about. Works perfectly and looks just right.
- Glued the silencer springs with CA glue to the retaining brackets.
|
| 98/11/29
Lots of painting done. I used Humbrol's Maskol extensively today. A
liquid mask is incredibly useful for masking highly irregular surfaces. I'll be sure to
always have a bottle of Maskol around!
- Brake Discs - painted with Buffing Burnt Iron and after buffing it
looks great! The discs had molded in concentric rings scribed into them which greatly add
to the effect.
- Chain - Non-Buffing Brass. Excellent for 'gold' finishes. Painted front
sprocket XF-56.
- Engine - painted required XF-56:2 + X-9:1. It looked a little too
brown, so I actually mixed it XF-56:4 + X-9:1. Some detail painted with the X-11 Paint
Pen.
- Exhaust Pipes - painted the exhaust brackets with Buffing Aluminum
Plate . While buffing the left exhaust broke off one bracket for the second time! I'll
glue back on during final assembly.
- Front Forks - painted the calipers with XF-56 and the lower part of the
shock with Non-Buffing Aluminum.
- Radiator - touched up the radiator with Buffing Aluminum Plate where I
rubbed through on the previous application. Made all the radiator hose clamps and
inserted wire into the hoses so they will resist kinking when being bent.
- Rear Shock - painted with X-11:1 + XF-10:1. This also looked a bit too
brown, but I left it alone. Some detail painted with the X-11 Paint Pen.
- Seat, Fork Brackets, Bodywork Brackets, Carb Caps, Hand Levers and Gas Cap
- all painted X-18
- Stand - painted X-1
- Steering Damper - painted with Non-Buffing Brass, XF-56 and X-11 Paint
Pen
Only a few things left to hand paint when fixed to the engine. Then final assembly can
begin. |
| 98/11/30
Another evening of mostly painting. This time with a brush.
- Clutch - XF-10 used to detail were plates would be seen.
- Engine - X-9 on exhaust flange, X-18 for oil cap, and XF-8 for plug
covers and X-11:1+X-9 on the coolant fitting.
- Front Forks - X-27 on rebound/rate adjuster.
- Grips - XF-1 for 'rubber' and XF-16 for ends.
- Rear Shock - X-2 for band around shock body and XF-16 for adjuster.
- Rear Sprocket - X-23 on the bolt heads.
Then I did some minor assembly. Added the plugs and exhaust flanges to the engine.
Thats it. |
| 98/12/01
More painting and minor assembly.
- Carburetors - gave them a wash with thinner:5 + XF-1:1 to highlight the
detail. Finished assembling them.
- Chain - usually I just give the chain a wash, but after examining the
box art and pictures of a 1:1 Honda NSR250 I tried something else. With a very fine paint
brush, I painted XF-1 between all the gold chain links on the sides. And on the top and
bottom of the chain between the rollers. Then I put a drop of XF-1 on top of each link
pin. I'm still admiring the end result. A very convincing looking chain and I'll be
painting all my chains the same way from now on.

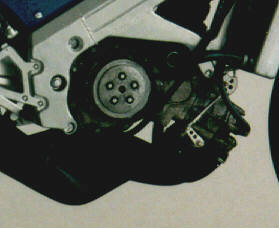
- Clutch & Alternator - washed with thinner:5 + XF-1:1.
- Engine - gave the engine a wash with thinner:5 + XF-1:1. I'm always
nervous taking a perfectly nice looking engine and splashing black thinner all over the
place. But, it looks great. The rough surface of the XF-56:4 + X-9:1 paint ended up giving
it a convincing cast appearance. And the wash settles in the crevices it helps all the
detail standout. After the wash was dry I glued on the clutch, alternator and
carburetors.
Right Side |

Left Side |
- Front Calipers - gave them a wash with thinner:5 + XF-1:1.
|
| 98/12/02
More painting and minor assembly.
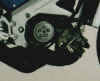
- Engine - attached reed adjuster linkage. Installed engine into frame
using provided screws.
- Exhaust Pipes - masked off silencer brackets with Maskol and painted
the pipes XF-1. The instructions specified X-18, but I always find the semi-gloss black
looks like gloss black and I think that would be too glossy. I'll give the pipes a wash of
thinner:10 + XF-1: + XF-18:1 to add a bit of a sheen to the surface.
- Front Calipers - dry brushed the lettering and bolt heads with X-11.
- Front Forks - painted the telescopic portion with Buffing Aluminum
Plate and buffed it to it's chrome like finish.
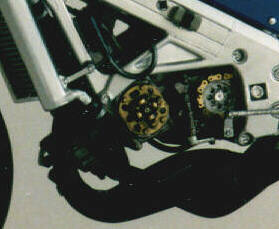
- Instrument Panel - painted with XF-20. The molded in instruments still
need to be detailed.
- Rear Coil Over Shock Spring - painted X-2
- Read Shock - installed the upper half into the frame and glued the rear
portion of the frame that was left unglue to allow shock installation after painting and
buffing the frame.
- Rear Swing Arm - temporarily attached to the frame with caliper, chain
and wheel to check fit of components. Perfect!
It is starting to look like a motorcycle now. The engine and chain detailing stand out
very well against the buffed aluminum of the frame and swing arm. I definitely think the
engine looks better with the slightly different XF-56 and X-9 ratio than what was
specified. And the chain looks even better on the bike. |
98/12/03
- Engine - added spark plugs wires. Since the vinyl tubing kinks when
routing I inserted metal wire into the tubing and shaped the plug wire before installing
it with CA glue. The wire in the tubing will also ensure it keeps its shape. I'll do this
for all the of the thin tubing.
- Front Fork - rubbed out the paint on the front fender and then
assembled the front fork.
- Radiator - installed the radiator and added the radiator hoses. Like
the plug wires, metal wire was inserted into the tubing so the hose could be shaped. The
hoses were installed with CA. And a drop of CA was placed on the wire hose clamps to keep
them in place.
- Rear Shock - installed the spring and lower portion to complete the
shock.
- Rear Swing Arm - permanently installed and added brake line.
- Tires - removed the mold line from the center of the tires using 120
grit sandpaper follow by 400 grit to smooth it up. This also gives the tire a used look.
|
98/12/05
- Engine - added a complete throttle cable to the
carbs. The instructions
just showed a short cable being tucked under the front of the tank. I inserted two wires
into the cable under the tank and ran them to each carb. Added the shifter linkage.
- Exhaust Pipes - added the pipe to the frame. Rather that give the pipes
a wash as planned I noticed the flat black developed a sheen when rubbed. So I rubbed the
pipes with my fingers and a Q-Tip to give it a very nice sheen that looks quite convincing
to me.
- Front Forks - added the completed assembly to the frame. Added the
front brake lines
- Instrument Panel - detail painted the instrument panel.
|
98/12/06
- Bodywork - lightly rubbed out all the bodywork using Tamiya's
Rubbing/Polishing Compound. Then washed the body parts in warm water to remove any
remaining compound. Taking a few minutes to do this makes a big difference in the final
look of the paint. And gives a smoother surface for the decals to adhere to. Applied
decals to the fuel tank and tail using Microscale's Mirco Set decal solution.
- Engine - added the reed adjuster and clutch cables. The two reed cables
are to run parallel so I used three wire wraps to hold them together.
- Instrument Panel - added the tachometer decal.
|
98/12/07
- Bodywork - test fitted the fuel tank/rear fairing and the upper front
fairing. They fit perfectly.
- Front Forks - added the remaining brake line from the right grip to the
brake fluid tank. I replace the 90 degree kit fitting with a piece of wire.
- Fuel Tank - added the fuel cock and the fuel lines. I wanted to route
the fuel lines right to the carbs, but it would have made installation and removal of the
tank difficult. So I just added the lines and shaped them so they curved down between the
carbs to look as if they are properly attach.
- Instrument Panel - added some X-22 over the tach for the 'glass'
|
98/12/12
- Bodywork - added number plate, Repsol graphics, NSR names, Dunlop
names, HRC logos, Repsol logos and Repsol name decals.
- Electronics Box - added decal.
- Front Fender - added Repsol name decal.
- Front Forks - added Dunlop decals.
- Rear Shock - added decal.
- Rear Swing Arm - added decals.
|
98/12/13
- Bodywork - added Repsol name over graphics and "4" on number
plate. Added some of the 'air hole' decals. After these had dried, I added the remaining
'air hole' decals and that's it for decals.
With all the handling of the bodywork during decal application some of the paint rubbed
off on some edges. Obviously the paint was not dry even after three weeks! I'll have to
touch it up once clearcoated and mounted on the frame. I think I'll try a different type
of paint on my next kit. |
98/12/27
- Bodywork - touched up the paint where it was rubbed off during
handling. Highlighted the heads of the fasteners. Touched up some areas where the decals
didn't cover perfectly.
The NSR250 is now complete and I plan to build a display stand for the front bodywork
so the engine, etc. remains visible. |