99/01/20 - 3.5 hours
- Started removing and cleaning up the parts from sprues B, C and D.
- Bodywork - glued rear bodywork halves together and cleaned up seam.
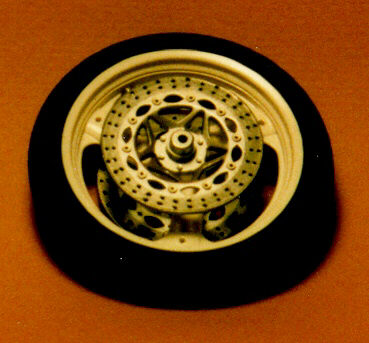
- Brake Discs - drilled out self cleaning holes with a pinvise.
- Engine - assembled engine block.
- Frame - assembled frame. Lower crossmember where the rear shock mounts
didn't align positively. So I made an educated guess and aligned the part with the left
side of the frame.
- Rear Axle - drilled out hole for a 'cotterpin' which will be made of
fine wire.
|
99/01/21 - 2 hours
- Cleaned up remaining parts of sprues C and D.
- Handle Bars - unlike the other Tamiya bikes I've built, the grips and
brake fluid tank are molded in. This ensures that everything is properly aligned when the
front fork is assembled. In places the mold lines take a bit more work to cleanup because
of this.
No assembly done. Like an auto kit, most parts will have to be detailed painted
before any major assembly can be done. |
99/01/22 - 2 hours
- Exhaust System - assembled the exhaust system. I temporarily
installed the engine so I could use the frame and engine as a jig to assemble the exhaust system. This ensured that
everything is properly aligned.
- Research - spent some time going over the box art and kit contents and
determined what extra details I plan to add. And what I'll leave for another project.
|
99/01/23 - 2 hours
- Airbox Ducting - the ducting is 'ribbed' and had a mold line down
either side of the ducting tubes and didn't look very nice even after cleaning up the
part. So, I filed off the ribbing and then slide a loose coil of 28gauge wire over the
ducting. The coil was made by wrapping the wire
around a 5/32" drill bit. I fixed it into place with some CA glue. For the 'webbing'
in between the wire, I coated the wire with CA glue so it filled in between the wire
spiral. This results in a very convincing hose and looks 100% better than the kit part.
- Exhaust System - on the back side of the exhaust pipe is a large
indentation. This is done since the pipe is too thick to mold without getting sinkholes.
Since I plan to have the body fairings removed occassionally, this would be visible. So, I
used some sheet styrene to fill the holes. And then used a mix of glue and shaved styrene
as a filler to finish it off.
- Tail Lights - glued tail light assembly to the rear fender.
|
99/01/24 - 1 hour
- Exhaust System - cleaned up seams now that everything has dried
thoroughly. Scratchbuilt the EXPU control on the collector using aluminum from a pop can
and sheet styrene.
|
99/01/27 - 1 hour
- Bodywork - cleaned up the front cowlings. They are clear and the
windscreen is part of the upper cowling.
- Light Lenses - cleaned up the headlight, tail light and turn signal
lenses.
|
99/01/28 - 1 hour
- Front Signal Light Housings - polished with Tamiya Polishing/Rubbing
Compound. These parts are plastic on the real bike so there is no need to paint them.
- Rear Fender and Signal Light Housings - polished the plastic.
- Signal and Tail Light Lenses - polished the plastic.
- Cleaned up the parts with warm soapy water to remove any compound residue.
|
99/02/01 - 0.5 hour
- Signal Light Housings - painted inside the housing with X-11 paint pen.
Much better result than the X-11 bottled paint.
- Signal Light Lens - painted the interior surface with X-26.
- Tail Light Lens - painted the interior surface with X-27.
I tried airbrushing the clear colours but wasn't getting the good coverage. So, I just
brush painted the lenses. Also, painting the interior surface give the impression of the
parts actually being molded in those |
99/02/03 - 1 hour
- Exhaust System - made all the springs
and loop brackets that secure the exhaust pipes. I made the springs by inserting a
very small drill into my pinvise with shank end out. Then wrapped the wire around the
drill and used tweezers to squeeze it together tightly. For the loop brackets, I wrapped
the same gauge wire around the shank of a X-Acto knife blade and flattened it out. Then I
cut down the middle of the loops creating several 'U'-shaped loops that will be CA glued
to the pipes before painting. The springs hook into these loops.
|
99/02/08 - 2 hours
- Research - Dropped by the local reference library and looked through
the service manual. I photocopied the electrical schematic, headlight diagram, tail light
diagram , instrument cluster diagram and cooling system diagram. I hoped to use this
information to add a wiring harness to the model. EXUP (EXhaust Ultimate
Powervalve) is a
computer-controlled butterfly valve located in the exhaust's collector. It was first used
on California-only models of the 1988 FZR400 in an attempt to make the high-revving little
motor pass the tighter emissions restrictions.
|
99/02/11 - 1 hour
- Bodywork - prepped all the bodywork for priming.
- Exhaust System - prepped the pipes for painting.
|
99/02/13 - 2 hours
- Bodywork - Forgot to glue a couple of pieces to the bodywork so I
couldn't prime the parts yet.
- Engine - Drilled holes in the exhaust flange on the engine in order to
attach the exhaust system springs.
- Exhaust System - Attached all exhaust spring loops to pipes. Added a
pin on either side of the collector for attaching the springs to the collector.
|
99/02/14 - 3 hours
- Bodywork - Masked off the windscreen with Tamiya Masking Tape and
primed all the bodywork and wheels with Floquil Reefer White.
- Bodywork Bracket - Painted with Buffing Aluminum Plate.
- Carburators - Masked off intakes with Maskol. Painted with Non-Buffing
Aluminum Plate.
- Chain Guard - Painted with Buffing Aluminum Plate.
- Engine - Painted with Non-Buffing Aluminum Plate. Painted cylinder head
with Buffing Aluminum Plate.
- Engine Covers - Painted with Buffing Aluminum Plate.
- Frame - Masked off parts with Maskol that will not be metalized.
Painted with Buffing Aluminum Plate.
- Front and Rear Discs - Painted with Buffing Magnesium.
- Front Forks - Masked off calipers with Maskol. Painted lower end of
fork with Non-Buffing Aluminum. Painted upper portion with Buffing Aluminum Plate.
- Oil Filter Base - Masked the filter with Maskol and painted the base
Non-Buffing Aluminum Plate.
- Rear Caliper Bracket - Masked off caliper with Maskol. Painted the
bracket with Non-Buffing Aluminum Plate and Buffing Aluminum Plate.
- Rear Swing Arm - Painted with Non-Buffing Aluminum Plate.
Buffed all the buffing metalizers using a cottonball and a cotton swab. |
99/02/21 - 4 hours
- Brake and Shifter Assemblies - Painted with Non-Buffing Aluminum:1 +
Non-Buffing Brass:1.
- Bodywork - Painted with X-2. Masked the irregular shaped gas filler
with Maskol.
- Front and Rear Discs - Painted the centers with Non-Buffing Aluminum
Plate.
- Oil Filter - Replaced the upper hose connector with a piece of #24
gauge wire to allow it to be bent to a proper shape.
- Radiator - Added a small piece of #28 gauge wire to the filler neck.
This will serve to attach the overflow tube. Also added a piece of #24 wire to the lower
right side which will allow the hose to be attached at the right angle.
- Rear Shock and Reservoir - Painted with Non-Buffing Aluminum:3 +
Testors Orange:1.
- Rear Shock Spring - Painted with X-8:3 + X-6:2.
|
99/02/23 - 2 hours
- Carburators - Highlighted with NBA:1 + NBB:1 and X-24.
- Frame - Painted the radiator brackets and fluid tank caps with X-18.
Highlighted rear bracket with NBA:1 + NBB:1.
- Front and Rear Calipers - Painted with X-18.
- Front Discs - Highlighted with NBA:1 + NBB:1.
- Oil Filter - Painted with X-18.
- Rear Disc - Painted spokes with X-18.
- Rear Shock - Painted adjuster disc with X-11.
|
99/02/24 - 1 hour
- Brake and Shifter Assemblies - Painted the foot pads with XF-1
and X-18.
- Engine - Painted some detail on the value cover ends with X-18.
- Frame - Finished the detail painting using XF-2 and NBB.
- Seat - Painted with XF-1 from the bottle. Mixed it with a touch of 70%
isopropyl alcohol to get nice smooth coverage. Once the paint was dry I buffed it with a
cottonball to given it a bit of a sheen.
|
99/02/26 - 2 hours
- Exhaust Pipes - Painting the pipes required several colours and parts
of the pipes had to be masked each time. The header pipes and the silencer were painted
with BAP. The collector was painted with XF-52:3 + XF-16:1. The tip and silencer pipe were
painted with NBB:3 + BAP:1. And the pipe from the collector to the silencer pipe was
painted XF-1:3 + XF-56:1.
- Frame - Since a few decals will be applied to the frame, I sealed it
with Model Masters Metalizer Sealer. This gives it a much more durable finish but slightly
takes away the metallic sheen.
|
99/02/27 - 5 hours
- Exhaust Pipes - Used CA glue to attach the retaining springs at the
collector.
- Front Forks - Also sealed the metalizer surface.
- Fuel Tank - Painted the airbox ducting.
- Wheels - Drilled out the casting holes in the spokes. I left them open,
but they should have some plugs covering the holes as the 1:1 bike does. A little dap of
white glue painted flat black or grey would do the trick.
Now that all the parts have been prepared, its time to start final assembly. I can back
up to step #1 in the instructions and start assembling the bike. In general I follow the
assembly sequence to the letter. But in some instances I may jump ahead to an unrelated
step while the glue sets on one step.
- Brake Lines and Radiator Hoses - inserted wire so I could bend the
hoses into their proper shapes.
- And construction as described in the manual.
|
99/02/28 - 4 hours
- Exhaust Pipes - Once added, I used CA glue to attached the retaining
springs at the cylinder head.
- Radiator Hoses - Added hoses clamps made from fine wire.
- And completed chassis construction as described in the manual.
|
99/03/01 - 3 hours
- Decals - Added the decals to the left side of the bike. Ran into a
problem with the decal for the side of the rear cowling. It just didn't want to conform to
the shape of the body. Decal solutions will be required to get the decals to conform.
- Mirrors - The mirror faces were glued into the housing using
Microscales's Kristal Klear.
|
99/03/02 - 2 hours
- Bodywork - once all the decals were completely dry, I trimmed any
excess around the openings and touched up some edges with X-4 and X-7. Drybrushed the
molded in fasteners with X-11 and did the windscreen edging and tail light opening with
X-18. Once this paint was dry all the bodywork was installed on the frame.
- Decals - Added the decals to the right side of the bike. Ran into
similar problems I had on the left side. I coated both side with another treatment of
Microscale Micro-Sol and it helped greatly to futher smooth out any imperfections.
- Frame - Added the kickstand and cowling support.
- Front Turn Signals - Glued on with CA glue.
- Fuel Tank - Added the vent and vent hose.
- Mirrors - Glued onto the body with rubber cement. I prefer rubber
cement since this will allow the mirror to pop off, rather than break off, if bumped.
|
| Done! - 40 hours
|