I was originally concerned that an
all silver/black paint scheme would look rather monotone and uninteresting. But with the
use of several Model Master Metallizers and several shades of black, the model comes to
life.
| 99/06/19 - 2.0 hours
- Prepped Parts - air cleaner case, bodywork, brake discs, engine case,
frame, pedals, shaft drive arm, step plates and transmission case.
|
99/06/23 - 1.5 hours
- Prepped Parts - battery, foot pegs, fork brackets, license plate
holder, kick stand, radiator, shock and wheels.
- Foot Pegs - had to fill some ejector pin marks with CA glue.
- Shock Body - had to fill some ejector pin marks with CA glue.
|
99/06/24 - 1.0 hour
- Prepped Parts - hand grips, handle bars, instrument cluster, mirrors,
rear fender, seat
All the parts on sprues A thru D have been prepped. All that remains in the chrome and
clear sprue. |
99/06/29 - 0.5 hours
- Frame - glued the frame halves together and used the engine to act as a
jig so everything was aligned properly.
|
00/01/08 - 1.0 hour
- Bodywork (B8)- the bodywork around the radiator had two areas with
moulded in texture to simulate wire mesh. This was removed from the part by drilling a
hole so the blade of a jeweller's saw could be inserted. The plastic was cut out using the
saw while being careful not to cut into the surrounding frame. The openings were then
cleaned up with files and sandpaper. The openings will be filled with black mesh from the
inside after bodywork has been painted.
- Radiator - added the radiator ends to the core.
|
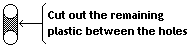
00/01/09 - 1.0 hour
- Brake Discs - drilled out all the slots in the discs. Each slot
required a hole to be drilled on either end and then a knife was used to clean out the
remaining plastic.
|
00/01/14 - 0.25 hours
- Front Forks (E1,7), Fuel Injectors (E10) Muffler
End ( E6) - stripped off the bright chrome plating using Easy-Off (tm).
|
00/01/15 - 2.0 hours
- Battery (C5) - shaved off the retained bolt off the battery and drilled
a hole with a #74 drill to accept a new retaining bolt made from #24 wire.
- Frame (C9,34) - drilled centers of bolt heads with a #78 drill so they
look like Allen heads.
- Fuel Injectors (E10) - drilled a hole at each injector with #78 drill
to accept #28 wire for the ignition wires. The four pieces of #28 wire go into a piece of
vinyl tubing so it looks like the wiring harness.
- Step Plates (D21,22) - added foot guards to the step plates. These were
made from #24 wire and bent them into a square "U" shape 3mm wide and 13mm long
and glued to the back of the step plates with CA glue.
- Masked all necessary parts in preparation for painting.
|
00/01/16 - 7.0 hours
- Bodywork (B1,2,3,6,7,8,9,10,11,12 )- primed all the bodywork with
Plasti-Kote Automotive Sandable Grey Primer.
- Brake Lines - Removed all brake line pins from the calipers, cylinders
and reservoirs and drilled holes with a #65 drill to accept smaller black coated wire
instead of the vinyl tubing. The smaller wire is more to scale than the tubing.
- Clutch Cable - this will also be replace with finer wire and the #74
holes were drilled at the engine and handlebars to accept the wire.
Finally, time to paint!
- Buffing Aluminium Plate - brake discs buffed with a cotton ball.
- Buffing Exhaust (sealed) - A friend pointed out that the Buffing
Exhaust Metalizer is an excellent finish to represent moulded black plastic that is
textured. So I painted airbox & ducting, rear fender, radiator core, rearview mirror
housings and trunk. It looks amazing!!
- Buffing Magnesium (sealed) - brake discs centers, engine covers,
transmission
- Non-Buffer Aluminium (sealed) - engine case, foot pegs, lower forks,
swingarm, step plates.
- Gloss White (X-2) - battery, license plate
- Gunmetal (X-10) - pipe from water pump and radiator.
- Semi-Gloss Black (X-18) - engine 'pan', frame, kick and side stands,
water pump
|
| 00/01/18 - 2.5 hours
Spent some time picking out some details with a paint brush.
- Chrome Silver (CR) - all bolt heads on the brake discs, engine covers,
frame, step plates & water pump.
- Flat Black (XF-1) - handle bar grips.
- Semi-Gloss Black (X-18) - brake calipers, handle bar controls levers
and grip ends & passenger foot guards.
- Smoke (X-19) - added a drop into the openings of the alternator.
|
00/01/19 - 1.0 hour
- Buffing Aluminium Plate (BAP) - wheels. Then buffed the outer edge and
the raised portions of the centers.
- Chrome Silver (CR) - top half of front forks, injectors, shock spring
retainer & exhaust tip.
- Exhaust (BEX -sealed) - instrument housings.
|
| 00/01/20 - 1.0 hour
Spent some more time picking out some details with a paint brush.
- Chrome Silver (CR) - the foot control levers, front brake line block
- Semi-Gloss Black (X-18) - brake calipers, "BMW" insert on
left engine cover, alternator guard, front engine mounts.
Also I added a wrinkles to the seat covering
since it was absent but clearly visible in the boxart. |
| 00/01/22 - 4.0 hours
Spent some more time picking out some details with a paint brush which
included such things as:
- Flat Black (XF-1) - rubber pads on the foot pegs and shifter and brake
levers.
- Gloss White (X-2) - the license plate and brake
fluid tank. First a
coat of Flat White (XF-2) was sprayed to act as a prime for the gloss. Otherwise the
acrylic tends to bead off smooth plastic.
- Bodywork - the fuel tank and muffler had a couple gouges that were
touched up with spot putty.
And starting assembling some of the parts:
- Engine - added the bottom and side engine covers and the water pump.
- Wheels - added the tires. And glued the front discs in place. Place the
wheels in a ZipLoc bag to keep the tires clean until ready to install in the bike.
|
00/01/23 - 4.0 hours
- Bodywork - re-primed the fuel tank, front cowling and muffler with
Plasti-Kote Automotive Sandable Grey Primer
- Radiator Hoses - the hoses need to be very short with complex bends.
This is impossible to do with the provided vinyl tubing. I used to insert a wire into the
tubing, but even this 'trick' won't work. I ended up moulding the tubing into the proper radiator hoses and added hose clamps made of Bare-Metal
Foil and small pieces of wire to simulate hose clamps.
|
00/01/25 - 0.5 hours
- Bodywork - applied the first coat of TS-17. A few dust specs got into
the paint and really stands out in silver. So, I'm going to let it dry thoroughly and then
sand out the dust specs with a super fine (12,000 grit) sandpaper from my polishing kit
before applying the next coat.
|
00/01/28 - 0.5 hours
- Bodywork - Used the LMG Polishing Kit to remove the bits of lint in the
paint. I started at 6000grit, then 8000 and finally 12,000. Its now ready for a final wet
coat.
|
| 00/01/29 - 4.0 hours
Spent some more time detail painting:
- Battery - masked off the battery and painted the battery tray with NBA.
- Bodywork - applied the final wet coat of TS-17. A couple more very tiny
pieces of lint, but I think I'll leave well enough alone and move on.
- Rear Brake Fluid Tank - painted the cap with BEX.
- Seat - painted with a mix of XF-1:3 + X-18:1 for a nice semi-matt black
for the 'leather'. The leather wrinkles disappeared but I buffed the paint with the back
of my finger and this gave the paint a nice sheen on the raised parts and left the ceases
matt. Looks very nice.
Some more assembly:
- Frame - installed the engine, transmission, radiator, radiator hoses,
rear fender and trunk.
- Engine - added the airbox, fuel injectors and fuel lines.
- Exhaust Headers - stripped the chrome plated off the parts and filled
the ejector marks with CA. I'll paint these with CR.
- Transmission - added the battery, fluid tank and clutch lever.
- Turn Signal Housings - cleaned up the parts and then polished with
Tamiya's polishing compound.
|
| 00/01/30 - 3.0 hours
Spent some more time detail painting:
- Front Brake Reservoir - painted with X-2.
- Front Forks - painted the rubbers with XF-1:3 + X-18:1.
- Instrument Panel - painted the lighted switches. First black for the
whole switch, then CR for the light, then X-26 & X-27 for the coloured lens. Finally
touched up the perimeter of the switch housings.
- Tail Light - painted the inside of the lens with X-27.
- Turn Signal Housings - painted the inside with CR.
- Turn Signal Lenses - painted the inside the lenses with X-26.
Some more assembly:
- Frame - added the clutch cable. Small gauge wire was used instead of
the provided vinyl tubing. The wire is closer to the scale size than the tubing.
- Right Step Plate - added the read brake cylinder.
- Swingarm - added wheel and brake disc and then added to transmission.
|
00/01/31 - 0.5 hours
- Rear Shock - cemented it into place.
- Rear Brake Line - substituted the vinyl hose with small gauge wire.
- Step Plates - cemented them into place.
|
00/02/01 - 1.5 hours
- Exhaust Headers - painted with CR.
- Muffler - painted the bottom and back with BT and sealed it. Then
masked and sprayed the heat shield with BE and sealed it. Without the sealer you can not
mask the metallizers. The tape would lift the paint.
|
00/02/02 - 2.0 hours
- Engine - added gear shifter lever.
- Exhaust - added exhaust headers, muffler and muffler tip. I had
added the muffler to the step plate first as per instuctions, but let it dry before test
fitting the header pipes. When I added the pipes, not all of them fit tight against the
muffler. So I used Kristal Klear on the muffler end and the Kristal Klear acted as a
filler.
- Front Forks - painted the brake line brackets with BM and
highlighted the fender mounting bolt heads with CR.
- Rear Fender/Tail Light - added lens using Kristal Clear and cemented to
the frame.
- Rear Wheel - added hub cover.
- Step Plates - cemented foot pegs and rear brake lever into place.
|
00/02/04 - 0.5 hours
- Bodywork - cut the radiator cowling screen from the extra screen in the
CBR1100XX kit. The screen was cut at a 45 degree angle to the weave.
- Front Forks - made the front brake lines using the coating from a
stranded wire and solid 28 gauge wire. I stripped the coating from the wire and then
inserted the 28 gauge wire. This makes it look like the rubber brake line attaches to a
steel brake line at the caliper.
|
00/02/08 - 1.0 hour
- Bodywork - the screen for the radiator cowling was glued into place
using Kristal Klear. The cowling looks much much better than if I left it with the moulded
in 'screen'. The final result makes the effort modifying this part was well worth it.
- Front Forks - assembled the front forks making sure everything was
perfectly aligned by propping each end of the forks on a level support. Then the brackets
were glued into place. Kristal Klear was used to secure the fender into the forks. The
brake lines were then cut to length and CAed into the brake line block on the lower
bracket. The the lower brake line 'nuts' at the caliper were simulated
by painting them
with NBA:1 + NBB. The front wheel was then added and the whole assembly temporarily
mounted on the frame.
|
00/02/09 - 1.0 hour
- Bodywork - Added all the decals.
- Handlebars - cemented the controls to the handlebars.
- Headlight - The headlight bucket has a couple holes to align the lens.
These were very visible after assembly, so I filled the holes with Kristal Klear and
painted them wit CR so it isn't quite as noticeable.
|
00/02/10 - 0.5 hours
- Turn Signal Housings - the housings just mount flush on the rear
cowling and headlight cowling. For a more secure mount, I drilled a hole into the body and
into the housings for a piece of wire to act as stud. This will give a more secure join
with Kristal Klear. I should have done this before painting and I unfortunately I
scratched the headlight cowling. So, I'll have to repaint it. I also added the lenses and
they were cemented into place with Kristal Klear.
|
00/02/13 - 1.0 hour
- Headlight Cowling - Added another coat of TS-17 to cover the scratch.
|
00/02/16 - 1.0 hour
- Bodywork - painted over the BMW emblems with X-22 to seal the decals to
the body and to give them an uniform shine.
- Instrument Panel - painted with X-22 to seal the decals to the panel
and to give them an uniform shine.
- Seat - gave the seat another coat of XF-1:3 + X-18:1 since I had to
touch up a spot on the side. This coat wasn't as flat as the first and actually looks
better.
|
00/02/20 - 0.5 hours
- Headlight Cowling - masked and painted the 'black' portion with X-18:3
+ XF-63. Again, straight X-18 looks too black and the mix looks much more realistic.
Everything is finally painted and ready for pictures and final assembly |
00/02/22 - 0.5 hour
- Headlight Cowling - cemented the headlight into the cowling using
Kristal Klear.
- Instrument Panel - cemented into the headlight cowling.
- Rear Cowling - cemented in the turn signal housings with Kristal Klear.
Each housing was cemented and allowed to dry while the cowling was turned on edge. This
ensured the housing stayed properly aligned since the Kristal Klear takes a while to set
up. You might want to use CA, but run you also run the risk of damaging the paint.
|
00/02/23 - 0.5 hour
- Headlight Cowling - cemented in the turn signal housings with Kristal
Klear using the same process as the rear cowling. Once the Kristal Klear had dried, the
assembly was cemented to the forks. Again. laying everything in such a way that everything
stayed in place while the cement dried.
- Mirrors - cemented the 'mirrors' into the housing using Kristal Klear.
|
| 00/02/26 - 0.5 hour
Complete final assembly of the K100. All assembly of body parts was done
with Kristal Klear. First I cemented the tank and rear cowling in place. Once dry I turned
the bike upside down to cement the front cowling in place. Now I could installed the forks
and handle bars and connect the brake lines to the controls. I didn't cement the handle
bars in place since the snapped into place. This will allow me to remove the forks if ever
necessary. The seat and mirrors are simply set into place without any cement. And finally,
the kickstand was CAed into place.
|
| 45.5 hours
Done!
Of all the 1/12 bikes, to date, this easily took the longest to
complete. Mostly because I was just taking my time through the whole project and tried
some new detailing tricks.
I was originally concerned that an all silver/black model would look rather monotone
and uninteresting. But with the use of several Model Master Metallizers and several shades
of black the model comes to life. |