![]()
|
The Appointment Setup subset of tools will control aspects of the calendar module, and will allow parameters regarding the appointment availability of the staff to be controlled.
This is the sub-menu that appears.

This menu choice will display the following dialog box.

This controls various aspects of appointments made. First, under the Time fields, enter the time the office opens and the time it stops receiving patients. These will serve as the limits of the appointment times.
Under Units, enter the increment at which appointment can be set. For example, setting the units to fifteen will allow appointments to be booked at 3:00, 3:15, 3:45, 4:00 and so on. Setting the units to thirty will allow appointments to be booked at 3:00, 3:30, 4:00, 4:30 and so on.
The Purge option refers to how often appointment records will be automatically purged, or deleted, from the database file. Purging unnecessary appointment information occasionally helps to save storage space. Set the interval with these options. Check Autopurge if you wish the program to automatically delete old appointments.
There are two additional buttons at the top of the toolbar. One is
Purge Appointments. Click this button to manually purge the appointments.
The second button,
, will allow you to edit the calendar pictures. These are the pictures that are available in the Calendar module as visual cues on certain days. Clicking on this button will open the following dialog box.

To create a new picture, you can paste one in from the clipboard or a separate file. To do so, click on the Select button. This produces the following dialog.
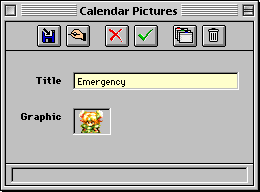
To create a new icon, click on the
button in the toolbar. Type the description of the icon into Title. Now, click in the box marked Graphic. If the picture you wish to insert has been copied to the clipboard, you can paste it in. Otherwise, choose Paste From File from the Edit menu and select the file.
If you are using the Macintosh platform, note that the file should be of Macintosh PICT file format. Once the title and graphic are in place, click
to save changes.
To edit an existing picture, select it from the Calendar Pics List window and click Select. Then, in the resulting window, click
and follow the above procedure to modify the graphic or title.
Operators are defined as categories into which appointments are booked. They can refer to dentists or hygienists at the office. Each dentist or hygienist has their own separate appointment schedule booked according to their availability; therefore each one is an Operator. Operators could also refer to dental chairs at the office. If, for example, there are three chairs available at the site, then each chair would have its own schedule for work done using it. In this case, the chairs themselves can be used as Operators.
The Calendar's appointments are defined using operators. (For more information about the calendar, see Patients » Calendar.)
The Operators menu item will bring up the following window.

To enter a new operator, click on the
when its record is displayed.
This will create blank appointment schedules for the selected operator. The reason this is done is so that the program will become aware of the various days on which the operator is free by first analyzing the dates and determining which ones fall within the operator's working days and hours. This can be thought of as initializing the operator's schedule by mapping it out beforehand; similar to initializing a disk.
Note that this must be done before the program will recognize free appointment times, such as when searching for such free time with the calendar module.
If a certain period of time is unavailable for appointments, it is possible to set up the program to automatically prevent appointments from being scheduled during those times.
This is the window that makes this magic happen.
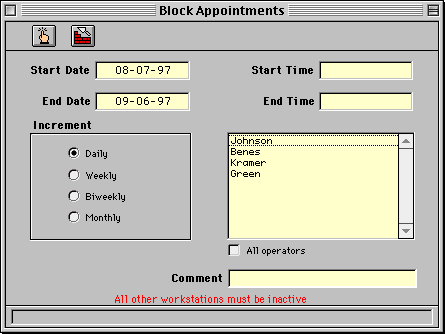
Select the operator for which to block appointments. To block appointments for all operators, check the All option.
Enter the time during which the selected operator(s) are not available for appointments into the Start Time and End Time fields.
Enter the date period for which to block the appointments into the Start Date and End Date fields.
Specify the frequency of the appointments to be blocked with the Increment option. This is how often the specified time period will be blocked during the time period. For example, checking Daily will block the time entered every day of the date period, while Weekly will block it every week during the period.
Enter the purpose for the block into the Comment field.
Click
Block Appointments in the toolbar when done.
The operator(s) will have whatever text entered in the Comment field in the specified times during the specified date period (see screenshot below).

The configuration portion of the program is divided into two sets of options: Setup and Special. Click here to discover the secrets of the Special configuration options.
This displays the financial totals for the current month and the year to date.
This will list all tax tables and allow them to be edited.
This will adjust all prices within a specified fee guide by a fixed amount or a percent.
Controls the setup information regarding the office's location, financial information and system setup.
Import a patient list from a data file.