Installing a Solid
Vinyl Door
Beyond The Screen Door
inspects and tests each door to ensure a proper fit in the frame
before it leaves the plant. These instructions will help you ensure
the proper installation for smooth operation.
The solid vinyl material
requires no further finishing. The color will not fade and the material
resists scratches, dents and chips. DO NOT PAINT your door,
as the paint will not adhere to the finished vinyl surfaces.
To maintain the look
of your door, simply clean periodically with plain soap and water.
A) Before you begin
Be sure to check the
following:
Measure your door opening
and check it with the sizing chart below to ensure you have the
correct door size. Measure the width in three places and the height
in two as shown, and use the smallest measurements to determine
your opening size.
| Door
Size |
Fits
Door Opening Sizes |
|
Width |
Height |
| 32"
x 80" |
31
3/4" to 32 5/8" |
79
3/4" to 80 5/8" |
| 34"
x 80" |
33
3/4" to 34 5/8" |
79
3/4" to 80 5/8" |
| 36"
x 80" |
35
3/4" to 36 5/8" |
79
3/4" to 80 5/8" |
If your door opening
does not fit any sizes in the chart, you may have to order a custom-sized
door or have a professional carpenter modify your doorjamb.
The installation is
much easier if you have a helper. Give the door time to adjust to
the outside temperature before you start.
Decide which way your
door will swing - usually the screen door is hinged on the same
side as the main door.
You will need these
tools:
- Power drill with
1/8" and 5/16" bits and Robertson screwdriver #8 bit
- Robertson screwdriver
(red handle)
- Phillips Screwdriver
(cross shaped)
- Straight Screwdriver
- Hammer
- Hacksaw
- Level
- Tape measure
- Framing Square
- Pencil
- Pliers
B) Hanging the Door
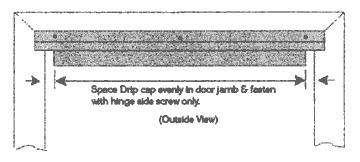
- Install Drip
Cap (Header Z-Bar)
Position the drip cap on top of doorframe and center it with an
even space on both sides, as shown. Fasten in place on the hinge
side only with a #8 x 1" screw.
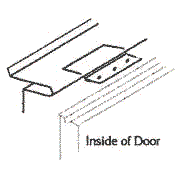
- Cut and install
hinge-side Z-bar on door
Measure the length from the underside of drip cap to the top of
your door sill. Check to be sure the hinge-side Z-bar is right
way up by holding it roughly in place, then cut the bottom to
length with a hacksaw. If your door sill slopes away, you may
want to cut to this angle. Have your helper hold the door on its
edge and place the Z-bar on it as shown. Make sure you are placing
the Z-bar on the edge you have chosen as the hinge side. Allow
the Z-bar to extend 1/8" past the top of the door. Center the
hinges in the hinge groove on the door's edge and fasten the Z-bar
with #8 x l" screws. The screws and the hinges will self center
themselves in the groove on the back of the door.
- Place door in
opening
Stand the door so that the hinge-side Z-bar is even with the end
of the drip cap and is pushed tight to the underside of the drip
cap. To prevent splitting the material, drill a 1/8" pilot hole
through the top mounting hole in the Z-bar, into the brick mould.
Secure the Z-bar with one #8 x 1 1/4" screw. If your door opening
is at the upper limits of the tolerances shown in the sizing chart,
you may need to secure shims between the doorjamb and the Z-bar.
After measuring, remove the door from the opening and secure the
required shims to the brick mould. Return the door to position
and replace the #8 screw. Ensure the Z-bar is straight and vertical
with a level, then secure it with the #8 x 1 1/4" screws. Remember
to drill l/8" pilot holes to prevent splitting. Open and close
the door to check that it swings freely and does not bind. With
the door open, drill 1/8" pilot holes through the mounting holes
on the inside edge of the Z-bar just above and below the hinges.
Install the eight #8 x 1 1/4" screws taking care not to over tighten.
If you have over tightened, and the Z-bar bends, back the screws
out slightly until the Z-bar springs back into position.
- Level and Secure
Drip Cap
Slightly loosen the screw holding the drip cap in position on
the hinge side. Adjust the drip cap until an even gap appears
between the drip cap and the top edge of the door. Drill pilot
holes through the drip cap and secure to the door frame with #8
x 1 1/4" screws.
- Cut and Install
Latch Side Z-bar
Measure from the bottom of the drip cap to the top of the sill
on the latch side. If your door sill is sloped you may want to
cut the Z-bar to match this angle. Be sure the Z-bar is right
side up, as with the hinge-side, then cut to length with a hacksaw.
Position the Z-bar on latch side, allowing a 1/8" to 3/16" gap
to show between the door and the Z-bar. Drill 1/8" pilot holes
through the mounting holes and secure with #8 x 1 1/4" screws.
Place plastic finishing caps on the screw heads of the exposed
screws.
With the door in place,
you can now install the lockset and closer hardware. Instructions
are included in the hardware packaging, or follow the hardware instructions
here.
CAUTION: BEFORE YOU
PROCEED WITH HARDWARE INSTALLATION, MAKE SURE THAT THE INSIDE OF
LATCH WILL NOT INTERFERE WITH THE MAIN DOOR HARDWARE.
|