


| Kit Details |

Tamiya 1/35 J.G.S.D.F. Motorcycle Reconnaissance Set -
Pictures
![]()
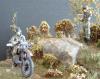 |
Here is an overall look at the finished base. The bulk of the terrain and made from 1-1/2" thick pink Styrofoam with thinner layers built up to get the foam at the various elevations of the terrain I wanted. The layers of foam where epoxied together. Then I used a hobby knife and 120grit sandpaper to shape the foam until I had the desired contours. |
|
|
|
 |
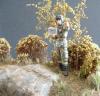
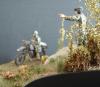
I thought it would be more visually interesting to have the figures on different elevations. So I placed the commander on higher ground for an better view of where he wants the rider to go next. |
|
|
|
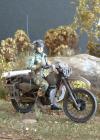 |
The bike was built pretty much out of the box,
all I added were some control cables and brake lines using some black
thread.
The rider also received some minor enhancements. I added wiring to the microphone and headset, an antenna to the radio, and removed the 'lens' from the goggles and filled them with MicroScale's Krystal Klear to simulate the clear lens. Tamiya acrylics were used for the bike and figures. And various earth tone artist's chalks were used to add 'dust' to the bike and rider's pants and boots. These figures were my first attempt at figure painting, so lots of room for improvement here. Bike and commander were secured to the base with pins CAed into the tires and boot soles. |
|
|
|
 |
The maps are just some maps printed on the laser
printer and then rolled up with a bit a white glue used to keep them
from unrolling.
The tail light and turn signal lenses were first painted with chrome silver and the clear red and clear orange applied over the chrome silver. Be sure the chrome silver is completely dry. Works well in giving the lenses a translucent look. |
|
|
|
 |
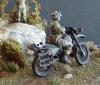
The tank commander also received wiring on the
headset and clear lenses in the goggles.
The trees behind the commander are dried flowers I found in a craft store. Luckily these were in their natural colour and not painted pink, purple, or some other odd colour. Not sure what they are, but looks similar to the "Candy Turf" used in the Creating Realistic Trees and Foliage article in FineScale Modeler, July 1997, page 56. |
|
|
|
 |
Here is a shot the gives better idea on the
change in elevation between the commander and roadway.
The dried flower 'trees' look better from a normal viewing distance. |
|
|
|
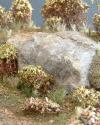 |
Nothing looks like a rock than a real rock. I
just washed the rock to remove any lose dirt. The surface of the rock
has some nice colour variations and a depression on the top where earth
and bush were placed.
A depression in the foam was carved to suit the rock and then cemented into place before applying the earth and grass. The grass can be represented with Woodland Scenic's Static Grass available at well stocked railroad modelling shops. Be sure to get a mixture of different colours or else the result will look too uniform.Just apply glue where you want grass, sprinkle on Static Grass, shake off loose grass and blow across it to make the grass stand up. Once dry, drybrush the grass to highlight it. |
|
|
|
 |
The earth on the embankment and under the grass
is real earth that I collected from the roadside. Before using it, I
spread it out on some cardboard in the sun to thoroughly dry it.
Afterwards I sifted it to remove the larger particles like rocks and
twigs from the earth and stored the two in different containers.
Cover the foam with grout cement, or similar, from the home improvement store. Then sprinkle on the fine earth and light press it into the cement. Dump off the loose earth. Now do the same thing with larger particles of earth, these will look like rocks. To permanently secure the earth, I applied a wash (50/50) of carpenter's glue and water, dabbed all over. Once dry, earth isn't going anywhere. Now you can paint and drybrush as you see fit. |
|
|
|
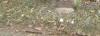 |
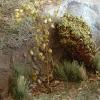
The leaves is merely a ground up real leaf. I
selected ones that easily disintegrated when handled. The leaves were
needed to get away from the manicured garden look that I found the base
had. You can see some twigs were also placed around the ground.
A real rock is embedded in the roadway. |
 |
|||||||||||||||
|
|||||||||||||||
 Home - News - Tips - Gallery - Workshop - Kits - Links - What's New? - Site Index |


