


| Kit Details |

Tamiya 1/35 German Military Bicycle - Notes
![]()
Tamiya's bicycle kit is very nice in itself and a quick build with only six pieces.
I build one bicycle OOTB and the only thing I did was cut the forks and reposition the front wheel and handlebars into a more natural look. This alone did wonders to improve the final look of the kit.
But, in 1/35 scale, wire wheels are impossible to moulded realistically. Its hard enough in 1/12 scale. So, I decided to build a second bicycle and apply Aber's PE set.
 Before
I added the PE, I modified the basic bicycle frame. I wanted to have the front
wheel steerable so I cut off the fork tube and replaced it with 1/16" brass
tubing. Then I drilled and inserted some wire into the front fork that slides
into the brass tubing. A very simply modification to make.
Before
I added the PE, I modified the basic bicycle frame. I wanted to have the front
wheel steerable so I cut off the fork tube and replaced it with 1/16" brass
tubing. Then I drilled and inserted some wire into the front fork that slides
into the brass tubing. A very simply modification to make.
Wheels
Now to add the Aber PE. I started by assembling the two wheels. To ease
assembly, I slide the rim and hub parts onto a axle or wire. By the way, I used
Extra Thin CA glue for assembly. Getting the two halves to have the right cup in
it takes some fiddling. Minor imperfections can be fixed when adding the wheels
to the tires.
Front Wheel
The kit spokes and forks were removed. I cut out the spokes and then slowly
filed and carved away the rim since the rim is on the new PE wheels. One the new
wheel was in place I added the forks. The PE forks were too long so I had to
shorten them at the hub ends, but no big problem. Fender stays were a snap to
install. I left the front wheel off until final assembly.
Chain & Sprockets
The two piece chain look deceivingly simple. In fact, it was the most difficult
part to assemble for me since it is so fragile. Once I finally aligned the two
halves without bending the parts it looked fine. I decided to leave off the
chain guard.
Rear Wheel
At first the rear wheel looked like it would be very difficult to do. But, I
just approached it like the front wheel and it was fine. In fact, I found it
easier after doing the front wheel for practice. Like the front, I cut away the
spokes and stays and the filed and carved away the rim. After adding the wheel
add the chain and then the chain stays. This way you won't have to cut the chain
like you would have to if the chain stays are added first. Fender stays were a
snap to install.
Rear Carrier
I glued on the folding shovel and then secured the shovel with the PE straps. A
drop of CA under the rack was used to hold the straps. With the rack added, the
rack supports were added. Again, very straight forward.
Seat
Another intimidating looking assembly. It is actual very easy to accomplish. I
removed the mould seat post and replaced it with some wire.
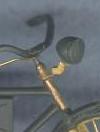
Headlight
Again, very straight forward and nothing noteworthy. Since I modified the fork
tube, it was now time to add the front wheel. The headlight bracket was slipped
over the wire and another short piece of brass tube slipped over the wire to
hold the headlight. And secure the front wheel.
Handlebars
The hand brake was then added to the handlebars and then the handlebars added to
the stem.
The next one I build, I'll also make the pedals operational so that they can be position after assembly.
![]()
Painting
The first thing I did was hand brush some Plasti-kote Automotive Sanding Grey Primer over all the PE joints to fill in any imperfections. Then I primed the whole model, followed by a base coat of XF-1. The bike's frame and fender stays were airbrushed with XF-63 lightened with XF-15. Then the tires were touched up with XF-1 since I had a bit of over spray.
The chain and sprockets were hand brushed with Dark Anodonic Grey (DAG) metallizer. The frame and spokes were also drybrushed with DAG to simulate worn paint. The shovel's case, handle and straps holding the shovel to the rack were hand painted with XF-64.
The rear reflector was painted with X-7 and the headlight lens with Non-buffing Aluminium.
A wash of very thin XF-1 was applied to along the edge of the fenders, case, chain and fittings to bring out the details.
I think thats it. The finished bicycle is destined to be hung on the front of a 1/35 FAMO semi-track.
 |
|||||||||||||||
|
|||||||||||||||
 Home - News - Tips - Gallery - Workshop - Kits - Links - What's New? - Site Index |


