99/04/25 - 4 hours
- Brake Discs - drilled out the holes in the rear disc. Quite a few holes
(120) so this alone took 40mins and shortened one #70 drill bit. (Note: Don't try
and watch TV while drilling discs!)
- Engine - cleaned up the case halves and cylinder head parts. Assembled
all the parts that will be painted with BAP.
- Frame - cleaned up frame halves and battery support, removed
unnecessary tabs and assembled the frame halves with battery support.
- Rear Fender - cut down the part as described.
- Swing Arm - cleaned up parts and assembled the swing arm.
|
99/02/26 - 3 hours
- Body work - cleaned up fuel filler cover, seat, cowling, front fender
and tank/rear cowling. Assembled the tank/rear cowling halves.
- Engine - cleaned up carburetors.
- Exhaust - cleaned up the front pipes and the muffler. Assembled the
muffler halves.
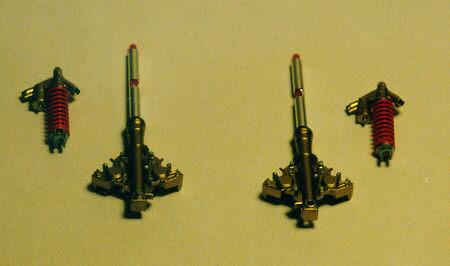
- Rear Shocks - cleaned up shocks and spring retainers.
- Stand - cleaned up parts and assembled bike stand.
- Swing Arm - cleaned up all rear brake components.
- Wheels - cleaned up the mold lines.
- Finished cleaning up all smaller parts remaining on sprues A and B.
|
99/04/27 - 2.5 hours
- Body Work - cleaned up seam where halves met. It is now ready for
priming to check for imperfections.
- Engine Covers - cleaned up the chrome parts. Tamiya located the 'gates'
so they are hidden once the engine is assembled. Well done Tamiya!
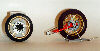
- Front Discs - drilled out self cleaning holes. This time it didn't take
as long this time, only 30mins for both discs. A total of 240 holes.
- Front Forks - de-chromed them with Easy-Off since most of it will
painted in gold. I'll redo the telescopic portions with Bare-Metal Foil.
- Fuel Filters - cleaned them up and scored them so they will look like
they have the paper element inside them.
- Muffler - cleaned up seam where halves met.
- Cleaned up remaining chrome and clears parts on sprues C and D.
|

99/04/28 - 1 hour
Just looked over the box art to see what extra details I might/should add
to the kit. It is pretty complete as is, but I think I'll do the following:
- Replace axle screws with 1/8" rod to eliminate screw
heads.
- Change brake hose connector on rear caliper to a banjo connector and add brake sensor
wires.
- Replace thin vinyl hoses with thinner black wire for throttle and clutch cables.
- Stain inside clear vinyl tubing so it looks like fuel is in it.
- Battery is completely visible, so I'll add a wiring harness with leads to the battery,
lights, etc.
- Add 'tie wraps' to secure the harness to the bike's frame.
|
99/05/02 - 20 min
- I washed all parts with warm water/detergent mix to remove any release agent,
fingerprints, etc. so no its ready for paint.
|
99/05/09 - 1 hour
- Bodywork - primed with Floquil Reefer White.
- Frame - primed with Floquil Reefer White.
- Rear Springs - primed with Floquil Reefer White.
|
99/05/10 - 15 min
- Bodywork - applied some spot putty where needed along seams of fuel
tank.
|
99/05/11 - 30 min
- Bodywork - wet sanded all the parts.
|
99/05/13 - 30 min
- Bodywork - re-primed the tank/rear cowl since the primer was sanded
through in places. This also sealed the putty.
|
99/05/22 - 5 hours
- Bodywork - wet sanded all the parts and painted with Italian Red. It
might be a little too orange, but I'm going to keep it as is. This is the first time I
used the MM Acryls and it sprays very nice and flat.
- Carburetors - painted with BM & XF-16. And pick out some detail
with NBB.
- Chain & Sprockets - chain painted with X-10 and sprockets with NBA.
- Engine - painted with NBA and detail painted the chrome engine covers.
- Exhaust Pipes - painted with X-18.
- Frame - painted with Italian Red.
- Front Fork Bodies - painted with NBB.
- Rear Shock Bodies - painted with NBB.
- Rear Springs - painted with Italian Red.
- Swing Arm - painted with Red.
- Wheels - painted with NBB and detail painted the valves with Chrome
Silver and XF-1.
- Painted the remaining odds & ends like seat, cowling brackets, bike stand, etc.
|
99/05/24 - 3 hours
- Brake Discs - painted with BM, NBA & X-18.
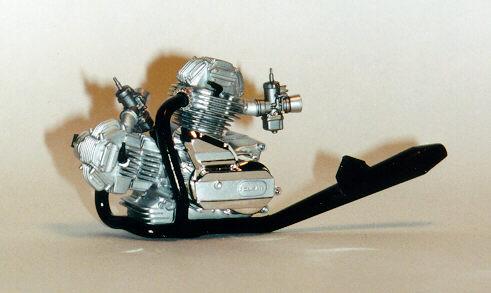
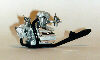
- Engine - completed the engine assembly.
- Frame - detail painted the rear brake cylinder.
- Front Forks - used Bare-Metal Foil on the shafts for a nice
shiny surface and detailed painted the calipers.
- Rear Caliper - assembled caliper on mounting bracket.
- Rear Shocks - used 'Ultra Bright Chrome' Bare-Metal Foil on the shafts
for a nice shiny surface. Assembled the shocks and detailed painted them.
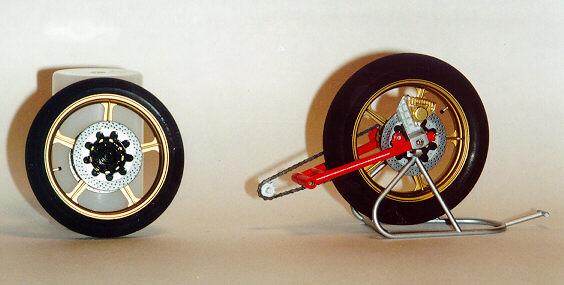
- Tires - removed mold line from tires with sandpaper and mounted them on
the wheels.
|
99/05/25 - 2 hours
- Bodywork - painted the fuel cocks on the tank with Chrome Silver
- Frame - touched up a few place where some Chrome Silver ran onto the
Italian Red.
- Fuel Lines - filled the clear fuel line with a mix of X-19:1 + X:23:1 +
X:24:1 to make it look like its full of fuel. Looks good but it still hasn't dried as it
is not exposed to air. I may have to connect one end of the hoes, fill it and connect the
other end to trap the "fuel" in the line.
- Handle Bars - finished detail painted the grips, etc.
- Swing Arm - touched up a few place where some Chrome Silver ran onto
the Italian Red.
|
99/05/26 - 2 hours
- Engine - added right engine cover and plug wires.
- Frame - added airbox, rear fender liner and installed engine into the
frame.
- Front Wheel - glued on brake discs.
- Swing Arm - assembled rear swing arm, wheel, chain and caliper.
|
99/05/27 - 30 min
- Bodywork - clear coated the tank/rear fairing, front fairing and front
fender.
- Exhaust Pipes - added to the engine/frame.
|
99/05/28 - 2 hours
- Front Forks - assembled the front forks and added the brakes lines.
Painted the ends of the brake lines with Chrome Silver to represent the compression
fittings.
|
99/05/29 - 2 hours
- Battery - painted and installed the battery. I didn't bother with a
wiring harness after all since I didn't have enough information to properly do one.
- Front Forks - installed on the frame.
- Took some in progress photos.
|
99/05/30 - 4 hours
- Bodywork - added all decals and used Micro-Set to soften them so they
would hug the surface better. I used a new technique for wetting the decals.
- Clutch and Brakes Pedals - added these to the frame.
- Front Forks - added decals.
- Handlebars - added the clutch lever.
- Swingarm - added decals.
- Throttle and Clutch Cables - attached all cables to the appropriate
connectors. I painted the ends with Chrome Silver to represent the cable ends.
- Took some in progress photos.
|
99/06/01 - 1 hour
- Frame - added the headlight bracket and fairing supports. These secure
the fairing to the frame.
- Tail Light - used 'Ultra Bright Chrome' Bare-Metal Foil for the
reflector surface and glued in the lenses with Kristal Klear.
|
99/06/03 - 1 hour
- Bodywork - clear coated the bodywork with MM Acryl Gloss Clear to seal
the decals.
- Front Forks - clear coated the decals to seal them.
- Fuel Filler - inked the recessed lines to add definition to it's
appearance.
- Swingarm - clear coated the decals to seal them.
|
99/06/04 - 30 min
- Bodywork - added fuel filler, seat and windscreen using Kristal Klear.
Then glued it to the frame with Kristal Klear.
- Fuel Lines - added remaining fuel lines filled with 'fuel'.
- Windscreen - added two remaining decals could only be applied after the
windscreen was added to the fairing.
|
| 99/06/04 - 36 hours
Done!!!
This was a very enjoyable kit to build. I especially like the fact the detailed engine
is in full view without any fairings covering all the work put into the bike. |