Installing the Hinges
(See Diagram 1):
 Choose
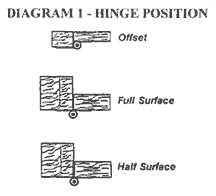
the method of hinge attachment. Your hinges may be installed full
surface, half surface or offset. The offset option in useful if
the thickness of the door and brickmould are different. Refer to
diagram 1 to choose the preferable method. NOTE: These hinges are
not to be mortised into door or jamb. Choose
the method of hinge attachment. Your hinges may be installed full
surface, half surface or offset. The offset option in useful if
the thickness of the door and brickmould are different. Refer to
diagram 1 to choose the preferable method. NOTE: These hinges are
not to be mortised into door or jamb.
Install the 2 hinges
on the door 7" from the top and the other, 11" from the bottom of
the door. Place the door in the opening using shims to ensure proper
clearance. Mark the hinge locations on the brickmould and the door,
then remove the door from the frame and remove the hinge pins. Install
loose hinge leases to brickmould and door at marked locations. Reposition
door in opening and insert hinge pins. Ensure door swings freely
and reposition if necessary.
Installing the
lockset (See Diagram 2):
 CAUTION:
BEFORE MOUNTING THE LOCKSET CHECK TO MAKE SURE THAT THE INSIDE LATCH
DOES NOT INTERFERE WITH THE MAIN ENTRY DOOR HARDWARE. With the door
in closed position locate the strike on the jamb in desired position.
Install the strike screws into the upper and lower slots of the
strike. Install third strike screw into centre hole. If required
use enclosed shims to extend the strike. Hold the inside latch assembly
against the door so latch bolt engages strike 1/4". With a sharp
pencil mark location of latch assembly. Place deadbolt pack on inside
face of door on the mark. Mark the position of the three holes.
Using a 5/16" drill, bore the three holes straight through the face
of the door. Note: Ream out centre hole by inserting the drill and
rotating with a slight wobbling action to clear and allow complete
freedom of motion for the spindle. Rotate the outside lever handle
so that it is aligned as shown in Fig. 1. CAUTION:
BEFORE MOUNTING THE LOCKSET CHECK TO MAKE SURE THAT THE INSIDE LATCH
DOES NOT INTERFERE WITH THE MAIN ENTRY DOOR HARDWARE. With the door
in closed position locate the strike on the jamb in desired position.
Install the strike screws into the upper and lower slots of the
strike. Install third strike screw into centre hole. If required
use enclosed shims to extend the strike. Hold the inside latch assembly
against the door so latch bolt engages strike 1/4". With a sharp
pencil mark location of latch assembly. Place deadbolt pack on inside
face of door on the mark. Mark the position of the three holes.
Using a 5/16" drill, bore the three holes straight through the face
of the door. Note: Ream out centre hole by inserting the drill and
rotating with a slight wobbling action to clear and allow complete
freedom of motion for the spindle. Rotate the outside lever handle
so that it is aligned as shown in Fig. 1.
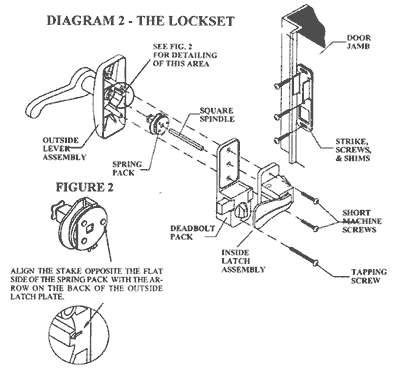
Align the spring pack
with the arrow on the back of the outside lever assembly. (See Fig.
2) Push the spring all the way into the back of the outside lever
assembly. Insert the square spindle into the square hole in the
back of the spring pack. Guide the outside lever assembly, with
the spindle, through the installation holes from outside the door.
Guide the deadbolt pack over the spindle. Guide the inside latch
assembly over the square spindle in the deadbolt pack. Insert the
two short machine screws through the inside latch assembly and draw
together. DO NOT TIGHTEN. Install the tapping screw into the bottom
hole of the deadbolt pack. TIGHTEN ALL THREE SCREWS. DO NOT OVER
TIGHTEN AS THIS MAY CAUSE THE HANDLE TO BIND.
OPTIONAL: Mark and chisel
clearance for the deadbolt into jamb, if desired.
Installing the Pneumatic
Closer (See Diagram 3):
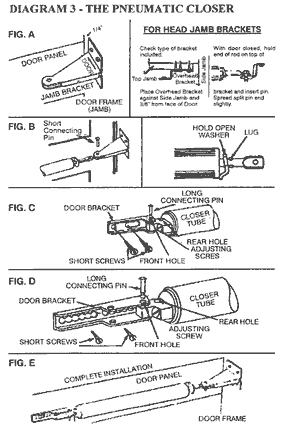
 The
pneumatic closer must be positioned in the middle of the mid rail
of the door below the spindles. Carefully measure to locate centre
of the rail. Make sure the door closes and latches freely before
installing the closer. First install the jamb bracket on the door
jamb lining it up with the middle rail (Figure A). Position it 1/4"
from edge of the door. Pre drill 1/8" pilot holes before securing
the jamb bracket. Slide the hold open washer onto the closer rod
and attach the rod to the jamb bracket with the pin (Figure B).
Attach the door bracket to the closer with the remaining pin (Figure
C). With the door closed, position the bracket on the mid rail and
mark the holes. Remove the door bracket from the closer and fasten
onto mid rail. Reattach the closer, position the bracket on the
mid rail and mark the holes. Remove the door bracket from the closer
and fasten onto mid rail. Reattach the closer to the bracket with
the pin (Figure E). The
pneumatic closer must be positioned in the middle of the mid rail
of the door below the spindles. Carefully measure to locate centre
of the rail. Make sure the door closes and latches freely before
installing the closer. First install the jamb bracket on the door
jamb lining it up with the middle rail (Figure A). Position it 1/4"
from edge of the door. Pre drill 1/8" pilot holes before securing
the jamb bracket. Slide the hold open washer onto the closer rod
and attach the rod to the jamb bracket with the pin (Figure B).
Attach the door bracket to the closer with the remaining pin (Figure
C). With the door closed, position the bracket on the mid rail and
mark the holes. Remove the door bracket from the closer and fasten
onto mid rail. Reattach the closer, position the bracket on the
mid rail and mark the holes. Remove the door bracket from the closer
and fasten onto mid rail. Reattach the closer to the bracket with
the pin (Figure E).
|


![]() Fax:
(519) 228-6455
Fax:
(519) 228-6455