Daysheets are created automatically when double-clicking on a day in the calendar. They serve as electronic schedules which track appointments throughout the day.
To view an operator's daysheet, select the desired operator from the list in the calendar and double-click on the day.
If a message appears asking whether or not to create a day, click OK to create a new, blank daysheet for the operator. To automatically create such daysheets, consult Administration » Configuration » Special » Appointment Setup » Create Appointments.
DAYSHEET VIEWED BY OPERATOR
Select an operator from the list in the calendar and double-click on a day to view the sheet for that day.

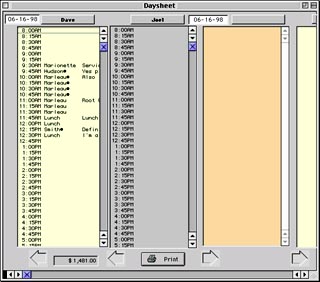
DAYSHEET FOR ALL OPERATORS
If the
button is used, a daysheet containing all operators and their appointments on the selected day in the calendar will appear. Each operator and the associated appointment list will appear in the same window.
DAYSHEET CONTAINING WEEKLY APPOINTMENTS
If the [] button is pressed, a daysheet for the selected operator containing all appointments on the week selected in the calendar will appear.

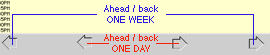
To display the previous or next day's daysheet, click on the arrows at the bottom closest to the center. To display the previous or next week's daysheet, click on the arrows at the bottom farthest from the center. Note that weekly daysheets (viewed with Week) can only be scrolled in one-week increments.
This page contains information pertaining to the main Calendar window.
Appointments are stored within the calendar as separate schedules for each operator. They can be entered and managed quickly and easily.
