Welcome to the MIRROR Information Services online manual. Probe is a cross-platform solution for administrative and financial needs specifically designed for medical and dental practices. This manual was designed to be a comprehensive guide to the features and functions of this program. If you are new to the program, please take a moment to read the manual overview.
This manual is organized in three ways. First, topics can be searched for according to their menu name. This is how the Table of Contents frame is organized. Use this if you are in need of information for a specific area of the program. Secondly, this manual contains a quick reference section for each portion of the program. This is a guide on how to accomplish basic functions in the program. Use this to answer most questions beginning, "How do I...?" Thirdly, there is a troubleshooting section, designed to address the most common problems that users may face.
This manual will assume that the reader is familiar with the operating system that they are using. This includes such tasks as mouse operations, menu selections, text editing, file opening and saving, disk operations and so on.
Although all screen shots are taken from the Macintosh version, the instructions within apply to any version of MIRROR (unless otherwise indicated).
BUTTONS | WINDOWS | MENU SETUP | TOP |
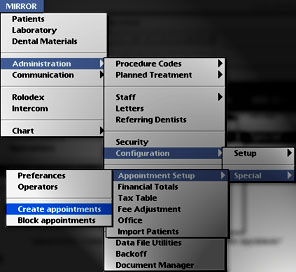
When referring to menu items, this manual uses the following notation: "Administration » Configuration » Special » Appointment Setup » Create Appointments". This refers to the "Create Appointments" menu item, which can be found by going through the MIRROR menu to "Administration," then from that menu to the "Configuration" sub-menu, and so on.
Therefore, to find the menu item, go to "Administration" under the "MIRROR" menu, then select "Configuration" from the sub-menu, then "Special," and so on.

"Administration » Configuration » Special » Appointment Setup » Create Appointments"
WINDOWS | MENU SETUP | TOP | MENU NOTATION |
Throughout the program, there are several buttons that will appear often. As they perform a similar function each time encountered, becoming familiar with these icons will be useful when working in Probe.
| ICON | FUNCTION |
| NEW- This creates a new record in whatever module the user is in. For example, clicking on this button in a procedure list will create a new procedure.
Use this button whenever you need to create a new entry into any data list. |
|
| EDIT- Click this button to enter the edit mode. This allows the data contained in the current record to be modified.
Use this button whenever the record displayed needs to be edited or corrected. |
|
|
CANCEL and CONFIRM- These allow modifications to a data record to be saved or discarded. Clicking CANCEL after modifying a data record will return the record to the state it was in prior to modification, while CONFIRM will save any changes made.
Use "Cancel" to cancel the current entry and leave the data untouched. Use "Confirm" to save any changes whenever you are finished editing a data record. |
|
PREVIOUS and NEXT- Click to display the previous or the next record in the series. |
|
FIRST and LAST- These will display the first or last record in the series. |
|
|
DELETE- This will delete the current record from the database. |
| PRINT- This button will print the current window, list or record. |
MENU SETUP | TOP | MENU NOTATION | BUTTONS |
You may encounter this button on the title bar of some windows:
. Clicking on it will collapse the window to an icon at the bottom of the screen.
To open a window from its icon, click on the icon.
TOP | MENU NOTATION | BUTTONS | WINDOWS |
Probe will open modules or features as separate menus instead of displaying all these menus at once. Due to the amount of features and the individuality of each module, this implementation allows access to all major functions and does not crowd the menu bar.
![]()
The menus can be accessed and dismissed from the menu bar like mini-applications. Features directly related to each other or to the task at hand will always be grouped in the same menu.