Choosing Periodontal from the Patient Manager window will open the Periodontal Record window and display the Periodontal Chart menu in the menu bar.
THE MENU
[image]
The Patient List item will display a list of patients who have a record in the Patient Manager.
The Recall List menu item displays a list of [].
Analysis [].
Color Editor will present a simple dialog box where the color codes for various depths in the periodontal chart can be set. To do so, click the
button in the toolbar and choose a new color from the drop-down list. To save your changes, click
.
The second last item, Pics, opens the Periodontal Picture List window. This is where the icons that show up on various charts can be changed. For more information, skip down to the section marked, EDITING ICONS.
Quit Menu will remove the Periodontal Chart menu from the menu bar.
To add a periodontal record to a patient's file, click the Periodontal button in the Patient Manager window. This will bring up the Periodontal Record window.
In this window, click
in the toolbar. Select the appropriate entry from the lists beside the Compliance, Tissue and Hygiene fields. In addition, check the labelled boxes below to record the patient's record of tooth care product use. These options will all be saved into the patient's file when the
For the patient's recall information and notes, click on the right-facing triangle in the bottom left corner of the window to expand the window (see screenshot below).
The additional information displayed consists of the patient's last and next scheduled appointments, according to the information set in the patient's recall information. Also, any notes recorded about the patient will appear.
PERIODONTIC MEASUREMENTS
To display the patient's periodontal measurements, click on the [btn] button in the toolbar of the Periodontal Record window. This will bring up the window listing such measurements by date entitled Periodontal Measurements (see screenshot below). Entries can be viewed by scrolling the list. The rows of boxes represent [depths of the teeth]. The icons displayed represent the [ ].
To display a legend of icons, click the
button in the toolbar (see screenshot below). In the legend, double-clicking on an icon will edit it, or allow a new icon to be entered. To learn more about editing icons, continue reading until EDITING ICONS.
To enter a new set of measurements, click the
[Tooth detail list doesn't seem to go into detail]
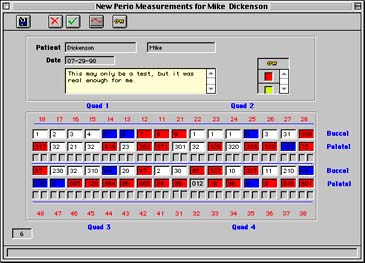
NEW PERIO MEASUREMENTS
In this window, click the
Enter the measurements into the text fields corresponding to each [tooth number].
To place the icons, drag each icon from the list entitled Pics to the appropriate position in the chart below using the mouse. Release the mouse over a field to place the icon in that field. Repeat this process until all information is entered. Click
[Chart button]
As in the previous window, it is possible to click on the
In the Periodontal Picture List window (also referred to as the legend), double-click on an entry or a blank space in the list. This will bring up the Picture Editor window.
To enter a new picture, click
button in the toolbar. To display the pictures list, click
in the toolbar.
In the Picture field, it is possible to either paste a picture from the clipboard or import it from a file.
To paste in a picture, first copy it into the clipboard from any application, then switch back to Probe and choose Paste from the Edit menu.
To import a picture from a file, place the insertion point in the Picture field and choose Paste From File... under the Edit menu. In the resulting file dialog box, choose the file from which you wish to import the picture.
Under the Description field, enter the description that will appear in the Periodontal Picture List window (the legend window).
When done, click
![]()
![]()
![]()