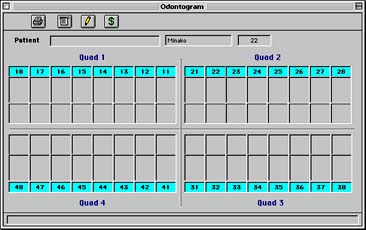
To access a patient's odontograms or enter a new one, click the Odontogram button in the Patient Manager window. This will bring up the following window.
This window will display the current patient's odontogram. The tooth's profile icon is shown along with an [occlusal/top] view of the tooth's surface.
The colour of the tooth number indicates whether the associated procedure has been done in the past, completed, or is planned (not complete).
The exact appearance of each icon varies between icon sets. In general, red fillings indicate an amalgam [sp?] procedure, while blue fillings are composite operations.
To modify a tooth, click on its number. This will open up a listing of various procedures. Choose the particular one that has been performed to enter it into the patient's record.
BUTTON DESCRIPTIONS
|
ICON
|
FUNCTION |
| Click on this button to display the Odontogram menu in the menu bar. (See THE MENU below) | |
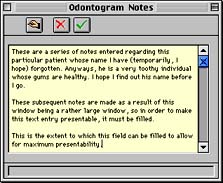
| This button will display any notes that have been associated with the current patient's odontogram data. This is the window that comes up.
Click on the |
|
| Use this button to display the patient's E-Chit.
The patient's E-Chit is a record of procedures performed on a patient's teeth that is recorded on a tooth-by-tooth basis. Each record contains the date, procedure number and description, tooth number and surface number (see screenshot below).
Many functions will automatically make an entry in the E-Chit. The Odontogram itself will update the E-Chit each time a procedure has been completed. [Edit by double-click?] To mark a record as processed, select it and click on the check box marked, Processed. Conversely, reverse a procedure, select the entry and click on the To enter a new record, click on the
Click the |
To display the Odontograms menu in the menu bar, click on the
button in the toolbar of the Odontogram window. The options available from the menu are:
Tooth Listing
This menu option displays a list or legend of the various icons used to represent each tooth in the Odontogram function. This is the window that appears.
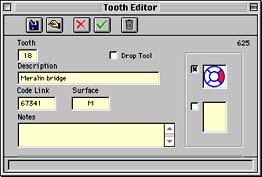
Displayed in the list is each tooth's number, description, code link and the two icons that represent two views of the tooth. To enter a new tooth or to edit an existing entry, double-click in the list to open the Tooth Editor window (see below).
Tooth Editor
The Tooth Editor window is used to edit the icons used in the Odontogram section to display teeth. To enter a new tooth, click
in the toolbar. To edit the entry displayed, click
.
Enter the tooth's number in the Tooth field, and a description under the Description field. The procedure code is used in the Code Link field, and the surface(s) that are affected by the procedure go in the Surface field.
To enter an image, click in either picture field at the right of the screen and paste in a picture from either the clipboard or another file.
To paste in a picture, first copy it into the clipboard from any application, then switch back to Probe and choose Paste from the Edit menu.
To import a picture from a file, place the insertion point in the Picture field and choose Paste From File... under the Edit menu. In the resulting file dialog box, choose the file from which you wish to import the picture.
Any detailed notes should be entered under the Notes section.
[The type of tooth affected is set using a series of options at the bottom of the window. If these are not immediately visible, resize the window to make them appear.]
![]()
![]()
![]()