The Disbursements menu allows you to track the various cheques that are printed for the office's expenses.
The Cheques To Print menu item will bring up a list of all cheques that need to be printed (see screenshot below). These include payroll cheques, payments to vendors and other, miscellaneous cheques.

To begin printing the cheques, select the cheques to print from the list. To select multiple cheques, drag over the cheques to select them. To select the entries one by one, hold down the command key while clicking on a cheque to add or subtract it from the selection.
When the cheques to print have been hilited, click on the Print Cheques option. There will be two options: Payroll and Standard.
Payroll will print the cheques with deduction information included with the remainder of the cheque.
Standard will simply print the cheques without the payroll information.
After printing, a dialog box will ask, Did the cheques print correctly? If they did, answer Yes and the cheques that have just printed will be removed from this list (since they no longer need to be printed). Otherwise, if the printing was not successful, the cheques will stay on the list until it is indicated that they have printed properly.
Use this option to enter cheques manually. This is the entry window.

First, click on the
button to enter a new cheque. Enter the relevant information into the top portion of the cheque. Next, enter the account from which this cheque is to originate from. The Recurring check box will indicate whether this is cheque is written on a regular basis. If it is activated, the cheque entered will be considered a recurring cheque. If the Printed box is hilited, then this cheque will be classified as printed and will not appear on the Cheques To Print list.
To post a cheque, click on the
button. This will save the cheque and post it into the log. To indicate that a cheque is pending, click on the
button. A pending cheque will be saved, but not posted. Pending cheques can be edited while posted cheques are final.
Click on the
button to reverse the cheque displayed.
Click on the
button to display a list of cheques. For more information about this list, keep reading.
This is essentially a list of all cheques, printed or not. First, specify the interval for the listing in the dialog box that appears. Then, the following window will open, containing a list of all cheques printed during that time period.
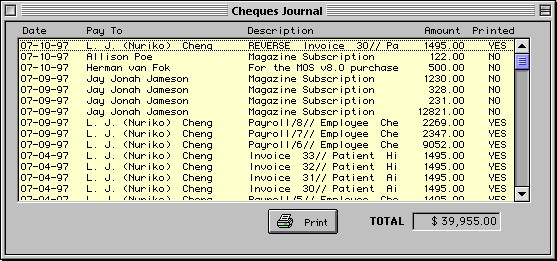
Click on the Print button to print this listing. Also, double-clicking on an individual cheque will display detailed information about that cheque.
In the program, it is possible to store frequently used cheques for quick and efficient entry. These are stored as recurring cheques. This is a list of those cheques.

To enter a new recurring cheque or edit an existing one, click on the Modify button. This will bring up the recurring cheque editor.

Click
to modify the one displayed. Enter the recipient's name, the amount and memo. Next, enter the information at the bottom which will indicate the bank account(s) the cheque will draw from. Enter the account numbers and the debit/credit amounts.
Preferences
[More later]
![]()
![]()
![]()