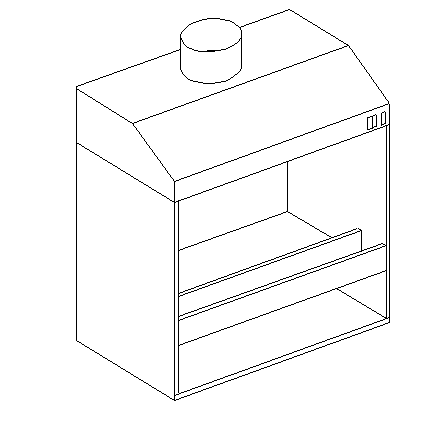
Figure 1.- The above diagram displays an isometric view of a finished booth
Figure 1.- The above diagram displays an isometric view of a finished booth
At some point the modeller will think about a paint booth. Painting inside a house or apartment can be annoying to all those around you not to mention potentially hazardous to your health. For safety reasons one should have a paint booth or paint outside. Having a paint booth means you can paint whenever you want to and not be dependent on the weather (except cases of extreme high humidity but that's another story).
There are hobby paint booths but they are usually small and expensive. You can make your own paint booth that has more room to work in and cheaper then those advertised.
CONSTRUCTION
A lot of people are intimidated by the amount of construction needed to complete a project such as this. A quick shortcut is to use a kitchen stove hood. There are a variety of systems. The better ones have two fans with two speeds and a light. The two speed fans are preferred. The light that comes with the unit aren't usually strong enough for our needs. We will also be adding our own. The big benefit of this system is that you will get a huge painting area compared to the hobby paint booths.
Due to the different types and sized of range hoods I can not give you exact dimensions for construction of the body. Most types of wood will do. The opening can vary in size but something 20" high will do fine. I use Formica panels which have a surface that you can periodically clean and the paint wont absorb into the wood.
If you are using wood it is recommended that you tack up paper sheets. These sheets will take the paint overspray etc. When these get dirty you can replace these. This is to prevent old paint dust from contaminating your current project and keep your paint booth looking clean.
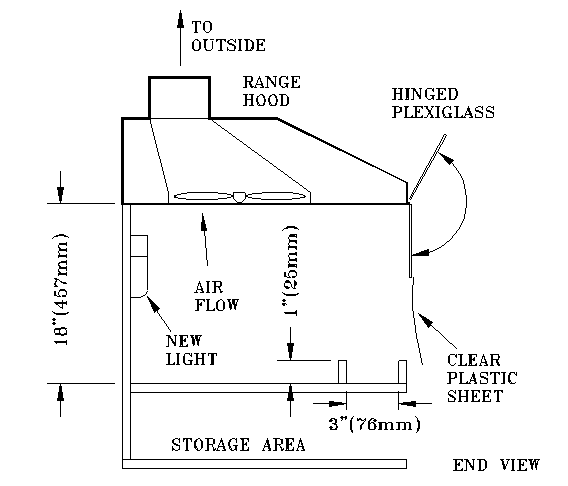
Figure 2 - The above figure shows a side view of a spray booth.
DRYER HOSE - OUTSIDE VENT
The top of vent will be hooked up with a dryer hose and then vented outside. The end of the hose had a sort of shutter that will remain closed until the fan turns on. The pressure forces them open. These items can be bought at any hardware store. Hopefully the vent exits into some remote spot and not onto an area where it can cause damage. In most kitchen hoods the fumes are extracted out the top (Fig 2) but in some cases they go out the back.
It should also be noted that some hoods are designed to vent inside the room. These are for kitchens that don't have any venting system. There is a filter that catches the grease and releases the air back into the room. A friend uses this system along with a water trap. This device channels the air into a little container with water in it. What happens is the air hits the water and the paint etc. gets trapped by the water. Every so often this has to be cleaned out. My friend says this takes out 90% of the paints and fumes and he gets little to no smell. Personally I prefer to vent the fumes outside.
Note; the dryer hose has that slinky look. This can, over time, cause paint dust to build up inside the ducting. This should be cleaned out every so often.
LIGHTING
The light in most range hoods are fine for cooking but we need more for painting. There are some people who are worried that any light source not sealed may explode when exposed to the paint fumes. I use fluorescent fixtures and to be safe I tape up any openings that fumes may get into. Another method is to use the clamping lights and have them outside the booth pointing in. If using this method at least two lamps are needed for each side. In figure 2 I have shown the added light at the back. In figure 3 there are two lights clipped onto the front
FAN MOTORS
There is also concern that the fan motors may be an explosive hazard from the paint fumes. If a motor has exposed brushes this causes a spark for every rotation. Not very healthy when dealing with potentially explosive fumes. A safe motor are sealed units or brushless. These produce no sparks and can not cause an explosion. As for the range hood fans, these are made to suck up the fumes from a stove. Quite often these fumes are full of grease. If this is not a fire hazard I don't know what is. As an extra safety feature I have a small 2lb fire extinguisher beside the paint booth (Figure 3). When buying one make sure it is ABC rated.
As a test I took my range hood outside and sprayed 100% lacquer thinner, aerosol cans etc. straight into the fan. If this isn't a perfect situation for a fire I don't know what is. This can also reassure you that the fan motors you have in your range hood are OK. The down side is your fan now has a layer of paint or the fan blade may be slightly melted from the lacquer thinner.
Mental note: Make sure you have a fire extinguisher beside you just in case.
FRONT COVER
Even though the fans are sucking up the fumes there can be some spill over into the room. To cut down some more on these you can add a front cover on the booth. Mine is a clear plastic sheet that if needed can be lifted off. The top portion is a thick acrylic sheet that I can look through. I also have a couple of holes for sticking my arms through. Another method that can be used are strips of clear plastic sheets like those found at some supermarkets. for me these are used during a heavy painting session or sessions with lacquer type paints. Figure 2 shows this front hood made of Plexiglas and sheet plastic.
AIRBRUSH HOLDER
Since this is a custom creation you might as well put an airbrush holder in an easily accessible place
COMPRESSOR SWITCH
My compressor has no switch on it. It runs when you plug it in. I have put this on a power cord to switch it on and off. If possible you can wire up a switch to the side of the paint booth to turn your compressor on and off. This way you can hide the compressor away to cut the noise down. This is shown in Figure 3 on the right side outside the booth. This can be placed anywhere that is comfortable for you. Although it shouldn't be inside the booth since some switch spark when turned on and off.
WIRING
It should be noted that I am pretty comfortable with wiring up items. Those not familiar with them should find someone who is to help them out or to explain how to do things safely.
FRONT LIP
During painting a lot of different things are being moved around. To make things easier a front lip/ tray should be made for quickly storing little items. Figure 2 shows a small front lip. This doesn't have to be too deep and is a personal preference.
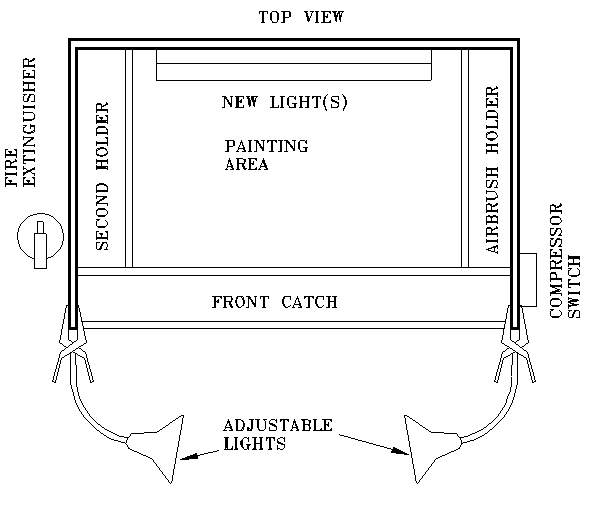
Figure 3 - Top view of the spray booth
CLEANING STATION
This is another items that is very helpful during airbrushing. Some sort of system with water or a cleaning solution can be designed so that travel back and forth to a sink is avoided. I myself don't have a foolproof system yet since I use enamels, acrylics and lacquers
RAISED ROTATING TABLE
These are nice items to have during the painting process. Makes life easier and the model isn't handled as much. For those who don't care about this, can use a variety of items. A friend uses beer bottles. I also use chunks of blue Styrofoam cut to the needed sizes with coat hanger wires sticking out of them. Use whatever you are comfortable with. To mount these things you can use double sided tape, hot glue etc.
RESPIRATOR
When using some paints a respirator is recommended. Paints like lacquers are very dangerous. Paints that are supposed to be safe (acrylics) may pose a health problem in large quantities. My motto is respirator for lacquers and enamels. For acrylics I generally don't use it unless I am having a large painting session. Lacquers and enamels don't smell so good so I use my front cover and my respirator if I am painting.
RUBBER GLOVES
No matter how careful you are I seem to always get paint on myself. To eliminate most of this I usually wear rubber gloves on the hand not holding the airbrush. They are pretty cheap and can be reused
SHELVES
While still on the customizing kick you should add a few shelves to the inside of the booth. You may not think you need it now but you will be surprised at how quickly you fill them up. For those super carpenters you can make shelving below the paint booth to store airbrush related items. Keeps these items in one easy to find place
AFTER PAINTING
After I finish painting I will leave the model inside the paint booth and leave the fan on. I will close the front cover so that any more fumes during the drying process is still sucked out. I will generally leave this on for a couple of hours.
DISCLAIMER: Since we are dealing with 1. Hazardous and explosive fumes, 2. Electricity I have been advised to put a disclaimer here :( The above paint booth works for me and I will keep using it. I have placed this tip here to help my fellow modellers but be aware that there can be potentially dangerous situations. If by following the above recommendations as seen on this web page and you 1. blow yourself up or 2. burn your eyebrows off or 3. electrocute yourself or 4. inhale a ton of hazardous fumes or 5. injure yourself during the construction of the booth (i.e. hit your thumb with a hammer) or 6. get into a fight with your better half or 7. any accident related to looking at, the existence of, thinking about or dreaming about the spray booth I will not be held responsible or be liable for any damages occurred. I also reserve the right to change the diagrams, the design of the booth even delete the web page without notice and without incurring obligations.
Happy Modelling
Return to Home Page http://www.interlog.com/~ask
Send comments, suggestions etc. to ask@interlog.com
These pages including all artwork are copyrighted 1998